Carved Whale Watermelon
Turn an ordinary watermelon into a delightful Whale Watermelon that doubles as both a stunning decoration and a delicious fruit salad bowl! This step-by-step guide makes carving a watermelon whale easier than you might expect. Whether you’re a beginner or a seasoned fruit carver, you’ll love how fun and achievable this project is. Perfect for summer parties, birthdays, or “Under the Sea” themed events, this carved whale makes a show-stopping centerpiece that pairs beautifully with your other watermelon decorations.
Servings 8
Calories 179kcal
Ingredients
- Watermelon
- cantaloupes
- strawberries
- kiwi
- blueberries
- grapes
Instructions
- To get started, place your watermelon on a stable, flat surface with the stem side facing toward you. This stem end will become the whale’s nose.
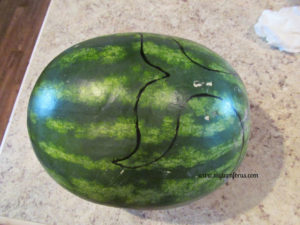
- Next, take a dry-erase marker and lightly sketch the whale’s features. Draw the eyes, a friendly smiling mouth, and the rounded top of the head. The dry-erase marker is perfect for this because the lines wipe away cleanly if you need to make adjustments. Don’t worry about making it perfect — have fun with it and give your whale plenty of personality!
- Start by using a dry-erase marker (or any erasable marker) to sketch the tail on the top of your watermelon. This allows you to adjust and tweak the design until it looks just right. Take your time and step back occasionally to check the overall balance.
- Once you’re happy with the shape, you can go over the lines with a permanent marker if you’d like a bolder, darker outline to guide your carving. Don’t stress about making it perfect — a little personality in the tail makes your whale even more charming!
- It’s very important to use a sharp knife to cut a small “X” through the top of the watermelon before making any other cuts.This simple step relieves the built-up pressure and air inside the melon. Without it, the rind can crack or split along your drawn outlines as you carve, which can ruin the design.

- By cutting the X first, you allow the pressure to escape safely, giving you much cleaner and more controlled cuts as you shape your whale. We’ve learned this the hard way in the past — it only takes a few extra seconds but makes a huge difference in the final result!
- Once your whale design is drawn, it’s time to start carving the main opening. Carefully cut along the outline you drew for the top opening of the whale. Work in small sections and cut away the unwanted rind in manageable pieces — this makes the process much easier and helps you maintain better control.
- After the top is removed, use a large spoon or melon baller to scoop out the red watermelon flesh. Leave the shell about 1 inch thick all around. This thickness gives your whale enough strength so it doesn’t collapse or crack while still holding plenty of fruit salad inside.
- Don’t throw away the scooped-out watermelon! Cut it into chunks and set it aside — you’ll add these sweet pieces back into the fruit salad mixture later. It makes the whale not only beautiful but delicious too.
- Next, carefully cut out the eyes completely, going all the way through the rind. This gives your whale that adorable, expressive look that everyone loves.
- For the mouth, only cut about halfway through the shell. Cutting it partially (instead of all the way through) is important — it creates a nice smile while preventing the fruit juices from leaking out once the whale is filled.
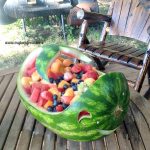
- Just before serving, fill your whale with a colorful fruit salad made of cantaloupe, grapes, strawberries, blueberries, kiwi, and the reserved watermelon chunks. Feel free to add any other favorite fruits — pineapple, mango, or raspberries all work beautifully too
Notes
Prior to filling with fruit, the whale may be covered with plastic wrap and refrigerated overnight.
Nutrition
Calories: 179kcal | Carbohydrates: 45g | Protein: 4g | Fat: 1g | Saturated Fat: 1g | Sodium: 6mg | Potassium: 644mg | Fiber: 3g | Sugar: 37g | Vitamin A: 3211IU | Vitamin C: 47mg | Calcium: 40mg | Iron: 1mg