Carving A Whale Watermelon Fruit Salad
Turn an ordinary watermelon into a delightful Whale Watermelon that doubles as both a stunning decoration and a delicious fruit salad bowl! This step-by-step guide makes carving a watermelon whale easier than you might expect. Whether you’re a beginner or a seasoned fruit carver, you’ll love how fun and achievable this project is.

Have you ever tried melon carving?
We’ve been creating fun carved watermelon decorations for years — from flowers and sharks to festive holiday designs — but our whale watermelon has easily become our all-time favorite. There’s just something magical about turning an ordinary watermelon into a smiling, spouting whale that doubles as a giant fruit salad bowl.
The best part? It’s not nearly as hard as it looks! With a few simple tools and some basic steps, anyone can make this charming centerpiece. It’s perfect for summer parties, birthdays, or “Under the Sea” themed events, this carved whale makes a show-stopping centerpiece that pairs beautifully with your other watermelon decorations.
This post contains affiliate links, which means if you make a purchase, we might receive a small commission at no additional cost to you. Please read our Disclosure Policy.
This post may contain affiliate links which means if you make purchase we might receive a small commission at no additional cost to you.
Over the years, we’ve made quite a few of these whale watermelons as part of our ongoing melon-carving craze. They’ve become one of our signature creations!
One of our favorite memories happened when my son was in fifth grade. His class had been studying ocean life and planned a fun “Under the Sea” party to celebrate. The teacher asked parents to bring dishes that fit the ocean theme. Without hesitation, my eldest daughter jumped right in and carved this whale watermelon for the occasion.
It turned out to be the undisputed star of the party! Kids gathered around it with wide-eyed excitement, and the teachers couldn’t stop complimenting how cute and creative it was. Best of all, since it was filled with fresh, colorful fruit salad, it was a huge hit with the moms too — a healthy treat that didn’t leave behind a pile of sugary snacks.
To complete your watermelon theme, consider adding some coordinating watermelon plates and napkins to your table setting. They instantly bring the fun, summery vibe together and make your carved whale the centerpiece even more eye-catching!
If you’ve caught the melon-carving bug like we have, you might also enjoy trying other creative projects from the Easy Watermelon Carving book. It’s filled with beautiful and achievable designs — everything from flowers and baskets to animals and festive shapes — perfect for beginners and experienced carvers alike.
Whether you’re hosting a summer party, a birthday celebration, or just want to surprise your family with something special, this whale watermelon is guaranteed to bring smiles and “wows” from everyone.
Carving a Whale Watermelon:

Carving melons is not nearly as difficult as it looks! It really just takes a little patience and a few helpful tricks — and we’re happy to share those tricks with you. We’re confident you’ve already got the patience part covered.
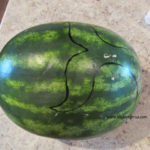
- To get started, place your watermelon on a stable, flat surface with the stem side facing toward you. This stem end will become the whale’s nose.
- Next, take a dry-erase marker and lightly sketch the whale’s features. Draw the eyes, a friendly smiling mouth, and the rounded top of the head. The dry-erase marker is perfect for this because the lines wipe away cleanly if you need to make adjustments. Don’t worry about making it perfect — have fun with it and give your whale plenty of personality!

Because every watermelon is a different size and shape, it’s impossible to create a one-size-fits-all printable template that works perfectly for everyone.
To help with this, we’ve created a simple graph you can use as a visual reference when drawing the whale’s tail. It gives you a clear idea of the proportions and shape, making it much easier to get that classic whale tail look.
Here’s how we recommend doing it:
- Start by using a dry-erase marker (or any erasable marker) to sketch the tail on the top of your watermelon. This allows you to adjust and tweak the design until it looks just right. Take your time and step back occasionally to check the overall balance.
- Once you’re happy with the shape, you can go over the lines with a permanent marker if you’d like a bolder, darker outline to guide your carving. Don’t stress about making it perfect — a little personality in the tail makes your whale even more charming!

Melon carving becomes much easier and more enjoyable when you use the right tools. A very sharp knife makes all the difference — it gives you clean, precise cuts and helps prevent the watermelon rind from cracking or tearing.
In addition to a good sharp knife, we highly recommend using special watermelon cutting tools. These handy gadgets (like carving knives, channel knives, and melon ballers) are designed specifically for fruit carving and can take your project from “good” to “wow!” They make shaping the fins, smoothing curves, and hollowing out the inside much simpler and safer.
Don’t worry if you don’t have fancy tools — you can still create a beautiful whale with just a sharp kitchen knife. But if you plan to do more melon carving in the future, investing in a few basic tools is definitely worth it!

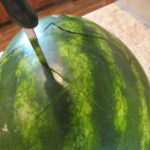
- It’s very important to use a sharp knife to cut a small “X” through the top of the watermelon before making any other cuts.
- This simple step relieves the built-up pressure and air inside the melon. Without it, the rind can crack or split along your drawn outlines as you carve, which can ruin the design. By cutting the X first, you allow the pressure to escape safely, giving you much cleaner and more controlled cuts as you shape your whale.
- We’ve learned this the hard way in the past — it only takes a few extra seconds but makes a huge difference in the final result!

- Once your whale design is drawn, it’s time to start carving the main opening. Carefully cut along the outline you drew for the top opening of the whale. Work in small sections and cut away the unwanted rind in manageable pieces — this makes the process much easier and helps you maintain better control.
- After the top is removed, use a large spoon or melon baller to scoop out the red watermelon flesh. Leave the shell about 1 inch thick all around. This thickness gives your whale enough strength so it doesn’t collapse or crack while still holding plenty of fruit salad inside.
- Don’t throw away the scooped-out watermelon! Cut it into chunks and set it aside — you’ll add these sweet pieces back into the fruit salad mixture later. It makes the whale not only beautiful but delicious too.

- Next, carefully cut out the eyes completely, going all the way through the rind. This gives your whale that adorable, expressive look that everyone loves.
- For the mouth, only cut about halfway through the shell. Cutting it partially (instead of all the way through) is important — it creates a nice smile while preventing the fruit juices from leaking out once the whale is filled.
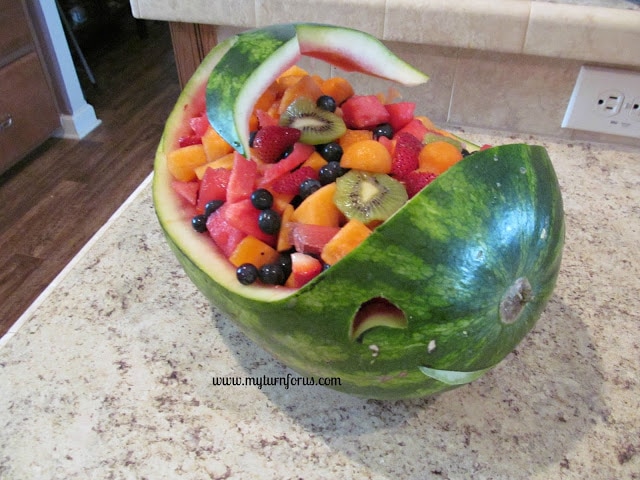
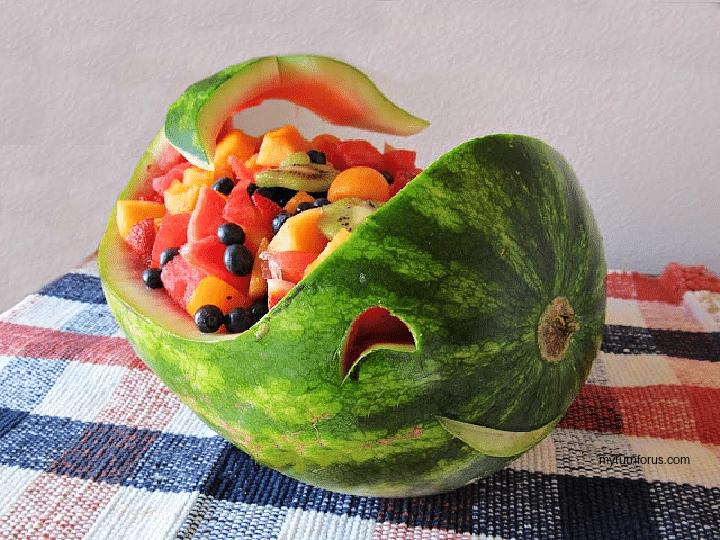
- Just before serving, fill your whale with a colorful fruit salad made of cantaloupe, grapes, strawberries, blueberries, kiwi, and the reserved watermelon chunks. Feel free to add any other favorite fruits — pineapple, mango, or raspberries all work beautifully too.
Helpful Tool Tip: To make preparing the fruit salad faster and easier, we recommend using a good set of fruit slicers and carvers. These handy tools can quickly cut uniform chunks and fun shapes, saving you time and giving your fruit salad a polished look.
Make-Ahead Note: You can prepare the watermelon whale in advance! After carving, simply cover it with plastic wrap and refrigerate it overnight. This is a great time-saver when hosting a party.
There you have it — your very own adorable whale watermelon ready to delight guests of all ages! Whether you’re hosting an Under the Sea party, a summer picnic, or a birthday celebration, this fun and fruity centerpiece is sure to be a showstopper.
We hope you give it a try and make some wonderful memories. It’s easier than it looks, and the smiles it brings are absolutely worth it!
Happy carving! 🐋🍉
🥣 Recipe
Ingredients
- Watermelon
- cantaloupes
- strawberries
- kiwi
- blueberries
- grapes
Instructions
- To get started, place your watermelon on a stable, flat surface with the stem side facing toward you. This stem end will become the whale’s nose.
- Next, take a dry-erase marker and lightly sketch the whale’s features. Draw the eyes, a friendly smiling mouth, and the rounded top of the head. The dry-erase marker is perfect for this because the lines wipe away cleanly if you need to make adjustments. Don’t worry about making it perfect — have fun with it and give your whale plenty of personality!
- Start by using a dry-erase marker (or any erasable marker) to sketch the tail on the top of your watermelon. This allows you to adjust and tweak the design until it looks just right. Take your time and step back occasionally to check the overall balance.

- Once you’re happy with the shape, you can go over the lines with a permanent marker if you’d like a bolder, darker outline to guide your carving. Don’t stress about making it perfect — a little personality in the tail makes your whale even more charming!
- It’s very important to use a sharp knife to cut a small “X” through the top of the watermelon before making any other cuts.This simple step relieves the built-up pressure and air inside the melon. Without it, the rind can crack or split along your drawn outlines as you carve, which can ruin the design.
- By cutting the X first, you allow the pressure to escape safely, giving you much cleaner and more controlled cuts as you shape your whale. We’ve learned this the hard way in the past — it only takes a few extra seconds but makes a huge difference in the final result!
- Once your whale design is drawn, it’s time to start carving the main opening. Carefully cut along the outline you drew for the top opening of the whale. Work in small sections and cut away the unwanted rind in manageable pieces — this makes the process much easier and helps you maintain better control.
- After the top is removed, use a large spoon or melon baller to scoop out the red watermelon flesh. Leave the shell about 1 inch thick all around. This thickness gives your whale enough strength so it doesn’t collapse or crack while still holding plenty of fruit salad inside.
- Don’t throw away the scooped-out watermelon! Cut it into chunks and set it aside — you’ll add these sweet pieces back into the fruit salad mixture later. It makes the whale not only beautiful but delicious too.
- Next, carefully cut out the eyes completely, going all the way through the rind. This gives your whale that adorable, expressive look that everyone loves.
- For the mouth, only cut about halfway through the shell. Cutting it partially (instead of all the way through) is important — it creates a nice smile while preventing the fruit juices from leaking out once the whale is filled.
- Just before serving, fill your whale with a colorful fruit salad made of cantaloupe, grapes, strawberries, blueberries, kiwi, and the reserved watermelon chunks. Feel free to add any other favorite fruits — pineapple, mango, or raspberries all work beautifully too
Notes
Nutrition
Click HERE to save these Carving a Watermelon Whale directions to Pinterest

What a friendly whale ! Love this idea, Evelyn !
Sooo, sooo, cute!! What a fun idea for parties and summer in general! 🙂
This was easier than I expected. Love it thank you!