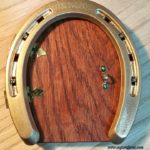
DIY Horseshoe Fairy Door
With a little bit of imagination and a few steps, make this Horseshoe Fairy Door to add that little bit of whimsy to your yard or garden.
Servings 2 Pieces
Cost $10
Equipment
- Jigsaw
- Drill and small drill bit
- small hammer
- Pencil
- Straight edge or ruler
- Sandpaper
- Clean cloth
- Paintbrush, if using brush-on sealer
Ingredients
- 2 decorative hasps approximately 5/8 by 1 7/8 inches
- 4 small-headed screws 3/4 inch long
- 1 gold-painted horseshoe
- 1 piece of 1/2-inch plywood
- Wood stain of choice
- Outdoor spray-on or brush-on water sealer
- Small nails included with the decorative hasps
Instructions
- Place the horseshoe on the plywood and trace around the outside with a pencil.
- Use a straight edge to draw a line across the open end of the horseshoe, creating the bottom of the door.
- Cut out the door shape with a jigsaw.
- Sand the edges and front surface of the plywood until smooth.
- Apply the wood stain, then wipe away the excess. Allow it to dry completely.
- Apply an outdoor water sealer to the front, back, and edges of the door. Let it dry according to the manufacturer’s instructions.
- Position the two decorative hasps along the left side of the door. Place the larger fleur-de-lis sections on the front and allow the smaller sections to fold around the side.
- Lay the horseshoe over the door and decorative hinges. Mark the four screw holes through the horseshoe slots.
- Drill small pilot holes to help prevent the plywood from splitting.
- Secure the horseshoe and decorative hinges to the front of the door with the four small-headed screws.
- Fold the smaller section of each hinge around the side of the plywood and fasten it with the included nails.
- Use one of the metal loops included with the hasps as the door handle. Mark its location and attach it with the included nails.
- Place the finished fairy door against a tree, stump, or wooden fence and decorate the surrounding area to create a small fairy habitat.
Notes
- Check the screw length before attaching the horseshoe. The screws should not come through the back of the plywood.
- Do not apply the water sealer until the stain has dried completely.
- Drying time will vary depending on the stain, sealer, weather, and humidity.
- One metal loop will be left over because two hasps are used, but only one loop is needed for the handle.
- Refresh the outdoor sealer when the wood begins to look dry or weathered.