DIY Golden Horseshoe Fairy Door
This DIY horseshoe fairy door started with a little tree stump in our backyard and a pair of gold horseshoes left over from another project. With plywood, decorative hinges, and a few simple tools, my hubby and I made a sweet little door for the fairy garden I had been imagining.
For the last year or so, I had been looking at a small stump in the backyard and thinking about turning it into a fairy house. I had all kinds of ideas—what my mother would have called my “brainstorms”—but there always seemed to be another barn chore, fence repair, or ranch project waiting for us.
While unpacking our St. Patrick’s Day decorations, I found the horseshoes I had painted gold the year before. The shape was just right for a little doorway, and the gold gave it the fanciful look I wanted for our fairy garden.
This post contains affiliate links, which means if you make a purchase, we might receive a small commission at no additional cost to you. Please read our Disclosure Policy.
Of course, hubby was soon pulled into the project. He was sweet enough to put down his big ol’ manly tools and help me make this tiny door. We made two while we were at it so we could send one to our granddaughters. Every fairy should have a proper front door, after all.

Why I Love This Little Fairy Door
This is a simple project, but those small details give it so much personality.
- The horseshoe makes a ready-made frame for the door.
- Decorative hasps look like old-fashioned fairy door hinges.
- It uses only a small piece of plywood.
- The stain and gold finish look right at home outdoors.
- You can attach it to a stump, tree, or wooden fence.
- It is an especially sweet project to make for the grandkids.

Supplies I Used
The complete supply list is in the how-to card below, but these are the main pieces that give the door its shape and character.
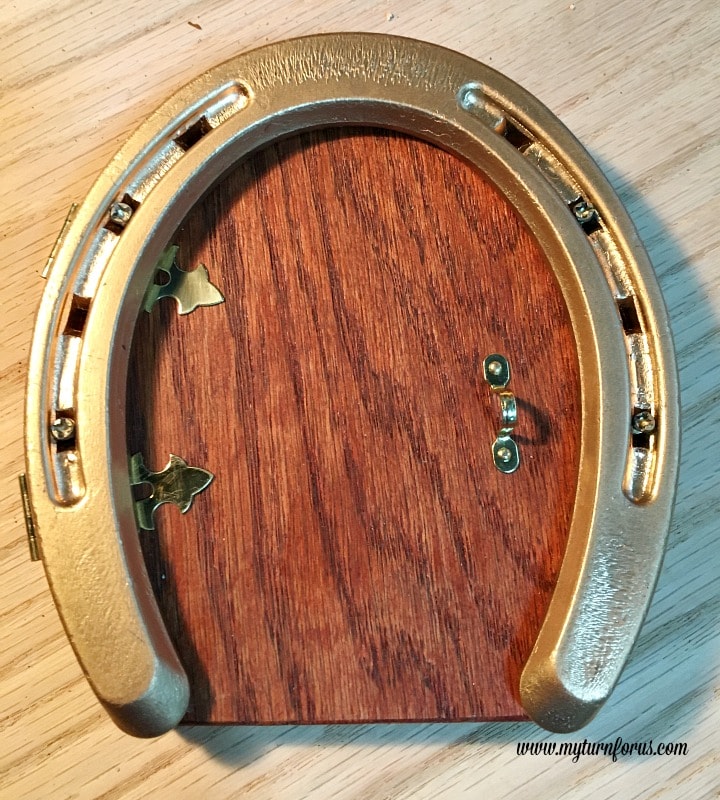
Gold-painted horseshoe: The horseshoe creates the frame around the door. I already had ours painted gold, which gave it just the bit of shine I wanted.
Half-inch plywood: This is thick enough to hold the small screws and nails without making the finished door too bulky.
Decorative hasps: I used 5/8-by-1 7/8-inch decorative hasps with a fleur-de-lis design. They serve as hinges, and the small metal loop included in the package makes a darling little door handle.

Wood stain: The stain gives the plywood a finished, aged-wood appearance. Use whichever shade looks best with your horseshoe and garden.
Outdoor water sealer: Since this door will be outside, I sealed the stained wood to help protect it from the weather. I used a product such as Thompson’s WaterSeal.
How to Make a Horseshoe Fairy Door:
The printable how-to card is below, but I have included the full process here with the little details that make assembly easier.
Step 1: Trace the Horseshoe Shape
Lay the gold horseshoe on the half-inch plywood and trace around the outside with a pencil.

Use a straight edge to draw a line across the open end of the horseshoe. This closes the shape and creates the bottom of the door.
Step 2: Cut and Sand the Door
Use a jigsaw to cut along the pencil lines.
Sand the cut edges and the front of the plywood until they feel smooth. I like to take a little extra care around the curved top because that edge will sit close to the horseshoe.

Step 3: Stain and Seal the Wood
Apply the wood stain according to the directions on the container, then wipe away the excess.
Let the stain dry completely before applying the outdoor water sealer. You can use a spray-on or brush-on sealer. I don’t like to rush this part because the finish needs time to dry before adding the small hinges and screws.

Allow the sealer to dry according to the manufacturer’s instructions. Depending on the products you use, the drying time may take several hours or overnight.
Step 4: Position the Decorative Hinges
Each decorative hasp package includes a hinge, a metal loop, and several small nails.

Place two hinges along the left side of the door and adjust the spacing until they look balanced. The larger fleur-de-lis section should rest on the front of the door, while the smaller section will fold around the side.

Step 5: Attach the Horseshoe
Lay the horseshoe over the door and hinges. The horseshoe helps hold the decorative hinge pieces in place on the front.
Mark the screw locations through the slots in the horseshoe. Drill small pilot holes before inserting the screws. This is one of those little steps that matters because it helps keep the plywood from splitting.

Secure the horseshoe with four small-headed, 3/4-inch screws.
Step 6: Secure the Hinges
Fold the smaller portion of each decorative hinge around the side of the plywood.

Use the small nails included in the package to fasten each hinge to the side of the door.
Step 7: Add the Fairy Door Handle
I used one of the metal loops included with the hasps as the door handle. It already had the right shape and size, so there was no need to buy another piece.

Decide where you would like the handle, mark its position, and secure it with the small nails included in the package.

You will have one metal loop left over because the project uses two hasps but only needs one door handle.

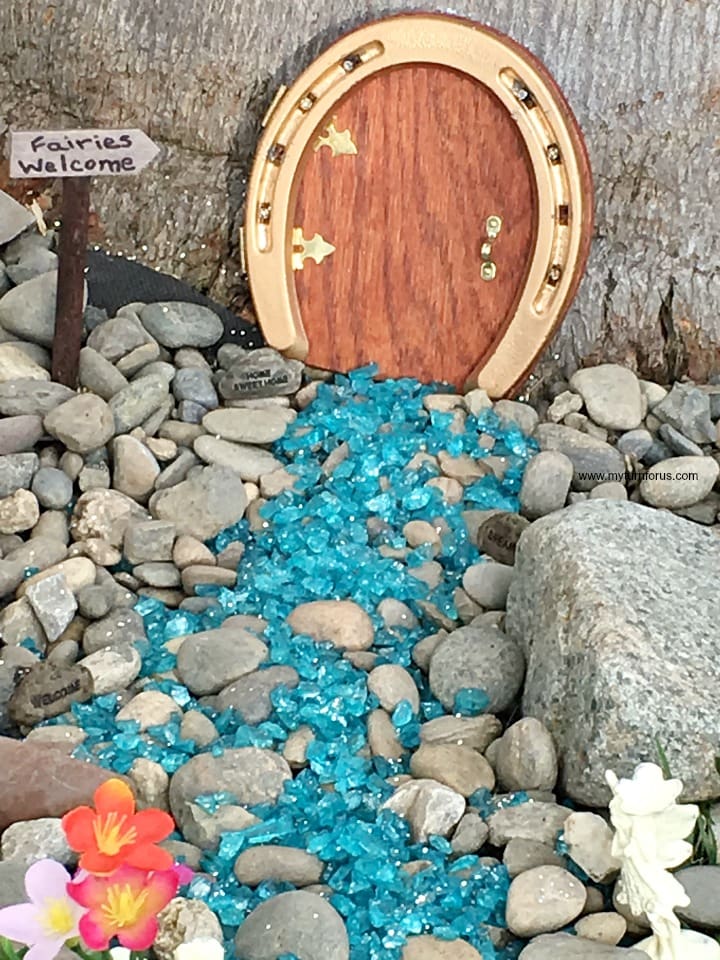
Step 8: Place the Door in Your Fairy Garden
Once everything is secure, find a tree, stump, or wooden fence for your fairy door.

Then comes the fun part—creating a small fairy habitat around it. You could add tiny furniture, flowers, stepping stones, and a picnic area. Fairies need to feel welcome and have the perfect place.
Our granddaughters told us that glitter will appear when the fairies move in, so we will be keeping an eye out for that.

Expert Tips
A few simple precautions will help the little door hold together and look neater.
- Drill pilot holes before adding the horseshoe screws. Small pieces of plywood can split when screws are driven directly into them.
- Let the stain dry before applying the water sealer. Layering the finishes too soon can leave the surface sticky.
- Seal the edges of the plywood as well as the front. The cut edges are exposed and will be outdoors with the rest of the door.
- Arrange the hinges and handle before fastening anything. It is much easier to move the pieces around before the holes are made.
- Check the screw length against your plywood. The screws should hold securely without coming through the back of the door.
Easy Ways to Change the Look
The basic method stays the same, but the finish can be changed to fit the garden or the little fairy who will live there.
- Paint the horseshoe silver, copper, black, or a favorite color.
- Paint the plywood instead of staining it.
- Add a small painted window or tiny house number.
- Decorate around the door with moss, pebbles, miniature flowers, or a short pathway.
- Use different decorative hasps for a simpler or more rustic look.
Frequently Asked Questions
No. The decorative hasps look like hinges, but the horseshoe is screwed over them and holds the door together as one solid decorative piece.
The outdoor water sealer helps protect the wood, but the finish may eventually need to be refreshed after exposure to rain and sun. How long it lasts will depend on your weather and where the door is placed.
I used a metal horseshoe because I already had one from another project. A similar horseshoe-shaped piece could work, but you may need to adjust the screw placement and weight.
Half-inch plywood gives the screws and small nails enough wood to hold onto. Thinner plywood may be more likely to split or allow the hardware to come through the back.
More Backyard and Garden Projects
Once you have made a little home for the fairies, you might enjoy adding a few more handmade pieces to the yard. Our 24 Fairy House Ideas are full of inspiration for building out the garden, while this Kitchen Grater Owl Garden Art adds a bit of character using an old kitchen tool. You might also enjoy making a Mason Jar Bird feeder or looking through our other Backyard and Garden Ideas.
If you make this cute horseshoe fairy door, I would love to hear where you placed it and how you decorated the fairy garden around it. Leave me a comment below, share a photo and tag me on Facebook, and don’t forget to leave a star rating in the how-to card. It helps more friends find our little ranch projects.
✂️ Printable Tutorial
Tools
- Jigsaw
- Drill and small drill bit
- small hammer
- Pencil
- Straight edge or ruler
- Sandpaper
- Clean cloth
- Paintbrush, if using brush-on sealer
Supplies
- 2 decorative hasps approximately 5/8 by 1 7/8 inches
- 4 small-headed screws 3/4 inch long
- 1 gold-painted horseshoe
- 1 piece of 1/2-inch plywood
- Wood stain of choice
- Outdoor spray-on or brush-on water sealer
- Small nails included with the decorative hasps
Instructions
- Place the horseshoe on the plywood and trace around the outside with a pencil.
- Use a straight edge to draw a line across the open end of the horseshoe, creating the bottom of the door.
- Cut out the door shape with a jigsaw.
- Sand the edges and front surface of the plywood until smooth.
- Apply the wood stain, then wipe away the excess. Allow it to dry completely.
- Apply an outdoor water sealer to the front, back, and edges of the door. Let it dry according to the manufacturer’s instructions.
- Position the two decorative hasps along the left side of the door. Place the larger fleur-de-lis sections on the front and allow the smaller sections to fold around the side.
- Lay the horseshoe over the door and decorative hinges. Mark the four screw holes through the horseshoe slots.
- Drill small pilot holes to help prevent the plywood from splitting.
- Secure the horseshoe and decorative hinges to the front of the door with the four small-headed screws.
- Fold the smaller section of each hinge around the side of the plywood and fasten it with the included nails.
- Use one of the metal loops included with the hasps as the door handle. Mark its location and attach it with the included nails.
- Place the finished fairy door against a tree, stump, or wooden fence and decorate the surrounding area to create a small fairy habitat.
Notes
- Check the screw length before attaching the horseshoe. The screws should not come through the back of the plywood.
- Do not apply the water sealer until the stain has dried completely.
- Drying time will vary depending on the stain, sealer, weather, and humidity.
- One metal loop will be left over because two hasps are used, but only one loop is needed for the handle.
- Refresh the outdoor sealer when the wood begins to look dry or weathered.
Click HERE to save this DIY Fairy Door instructions to Pinterest

Evelyn, what an perfect little fairy home. I've been working on my yard this week and have fairies too. We are so alike! I bet your sweet little granddaughters will love this place.
Hugs, Wanda Ann
This is soooo cute!! My kiddos would love to make something like this!
Wonderful idea for my grandson
I really love this idea, I have a stump near my pond, this would look perfect on. Thankyou
I love this and will be making this adorable horseshoe door. How did you attach it to the tree! Thank you
We used a controversial method, nails. We haven’t had any issues using nails but you might wish to contact your local nursery and follow their advice on using nails or not.