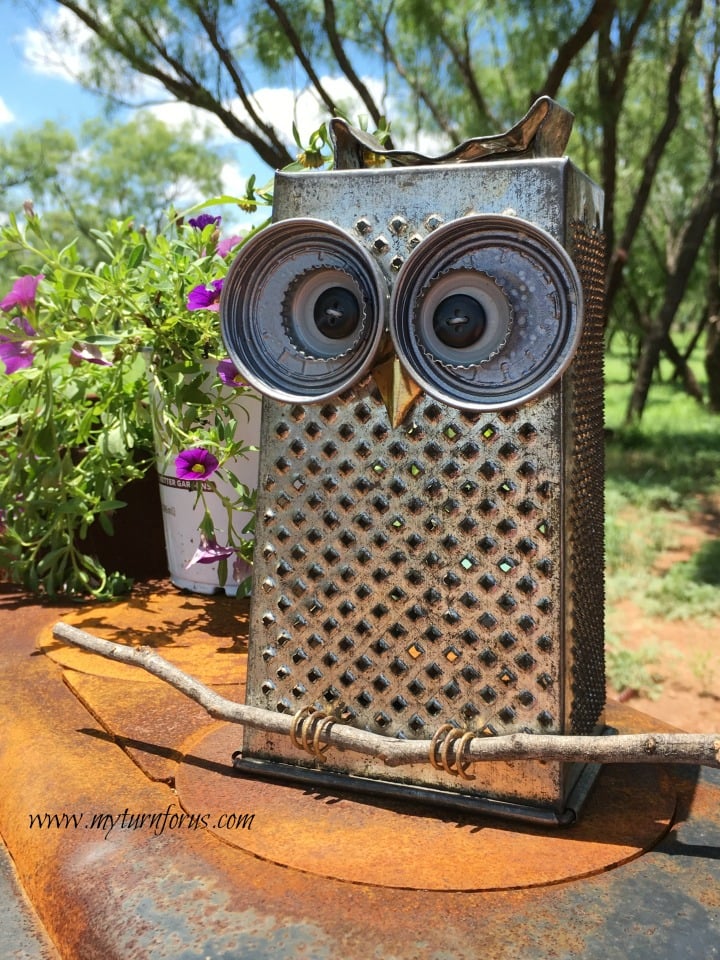
Kitchen Grater Owl metal garden art

So my hubby and I recreated our own version of a Cheese Grater Owl and wrote out all the instructions for you. But remember there are probably many variations of this little owl, so feel free to let the creative juices flow and change or adapt all or any of these steps.
We found the vintage (old) grater in an antique shop for less than $7 and a few springs that were priced at 4 for $1. Everything else we found around the house so this was a fun and inexpensive project that looks adorable in my kitchen or even in my garden.
This post contains affiliate links, which means if you make a purchase, we might receive a small commission at no additional cost to you. Please read our Disclosure Policy.

This post contains affiliate links which means if you make a purchase we might receive a small commissional at no additional cost to you.
Here’s how we made our owl from this old cheese grater (shown above)
How to make Kitchen Grater Owl Art:
Supplies Needed:
- 1 antique cheese grater, old or even new
- 2 lids from jars of baby food
- 2 bottle caps
- Silver spray paint
- 2 Black buttons that are almost as large as the bottle caps
- Small spring (to be cut for feet)
- Small twig that fits inside of the springs (feet)
- Piece of gold colored soft metal, aluminum (Spam can, snuff lid, some beverage cans)
- Wire to attach eyes (small enough to fit thru the holes of the buttons
Instructions:
Start your garden metal art project by gathering together two baby food jars and a couple of bottle caps. Remove the lids from the jars. (save jars for another project)

Drill two small holes in top of baby food lids and bottle caps to correspond with the holes in the buttons. Spray the top and bottom of the baby food lids with the silver spray paint , set aside to allow to dry completely.

Cut the gold metal aluminum (soft metal) into a “V” with the arms extended enough to “catch” the wire from the eyes. Place in a desired location and drill holes thru the gold metal into the grater. These holes should correspond with one of the holes for each eye. Drill a second hole for each eye just to the outside of these first holes. (to correspond with the holes of the buttons and lids)

Cut a 3″ piece of wire and bend into a “U”. Thread both ends of the wire thru the holes of the button and add the bottle cap lid and then the jar lid to make the eyes. Thread the ends of the wires thru the holes drilled on the grater, making sure to catch the gold colored nose. Twist wire ends together on the inside of the grater to secure the eye assembly.

Repeat for the second eye

Using needle nose pliers, bend the handle of the grater into an owl head shape with the tuffs of ears on each side.
Note: When choosing your grater, check the handle, some are less pliable than others and choose one that will be easier to shape.

We had found a few old rusty springs in the same antique shop where we found the graters, so a couple quick cuts leaving about three rolls of the spring for each foot.

Roll the little spring feet into one of the holes of the grater on each side and carefully slide a twig through the springs securing them to the grater. The twig actually secures the spring feet by putting pressure on them to twist them horizontally.

Then start all over and make another one! Because we made this one for our Mom and I loved him so much, we had to make another one for our kitchen. Or should I put him in the garden?

Other fun projects like this Garden Metal Art
- 23 DIY Backyard Garden Projects
- Horseshoe Fairy Door
- Mason Jar Solar Lights
- Vintage Crochet Doilies on Embroidery Hoops
Click HERE to save this Metal Garden Art Owl to Pinterest
Tools
- Wire cutting pliers
- Drill with small bit
- metal cutting pliers
- needle nose pliers
Supplies
- 1 antique cheese grater old or even new
- 2 lids from jars of baby food
- 2 bottle caps
- Silver spray paint
- 2 Black buttons that are almost as large as the bottle caps
- Small spring to be cut for feet
- Small twig that fits inside of the springs feet
- Piece gold colored soft metal aluminum (Spam can, snuff lid, some beverage cans)
- Wire to attach eyes (small enough to fit thru the holes of the buttons
Instructions
- Start your garden metal art project by gathering together two baby food jars and a couple of bottle caps. Remove the lids from the jars. (save jars for another project)
- Drill two small holes in top of baby food lids and bottle caps to correspond with the holes in the buttons. Spray the top and bottom of the baby food lids with the silver spray paint , set aside to allow to dry completely.
- Cut the gold metal aluminum (soft metal) into a “V” with the arms extended enough to “catch” the wire from the eyes. Place in a desired location and drill holes thru the gold metal into the grater. These holes should correspond with one of the holes for each eye. Drill a second hole for each eye just to the outside of these first holes. (to correspond with the holes of the buttons and lids)
- Cut a 3″ piece of wire and bend into a “U”. Thread both ends of the wire thru the holes of the button and add the bottle cap lid and then the jar lid to make the eyes. Thread the ends of the wires thru the holes drilled on the grater, making sure to catch the gold colored nose. Twist wire ends together on the inside of the grater to secure the eye assembly. Repeat for the second eye
- Using needle nose pliers, bend the handle of the grater into an owl head shape with the tuffs of ears on each side.
- Note: When choosing your grater, check the handle, some are less pliable than others and choose one that will be easier to shape
- We had found a few little rusty springs in the same antique shop where we found the graters, so a couple quick cuts leaving about three rolls of the spring for each foot.
- Roll the little spring feet into one of the holes of the grater on each side and carefully slide a twig through the springs securing them to the grater. The twig actually secures the spring feet by putting pressure on them to twist them horizontally.

Such a cute idea! =)
I love this! It's super cute!
So creative and absolutely adorable!
Adorable! I never would have thought of this!
Very cute! And I'm pinning so I have the instructions when I find my cheese grater. I think I'd put mine in the garden….but then again it would be perfect in the kitchen. Ok, maybe I'll make two!
nice
Love this, so cute. I love owls. I made one similar using a large oval wood piece. It turned out pretty cute.
My daughter created one and it turned out adorable. She added wings by using 2 vintage pierced pie servers by bending the handles over the top sides and ta-da, instant owl wings! We used E6000 to glue the eyes but I like your idea better.
ADORABLE owl project!
This is so flipping cute I love it!
Thanks so much! It was a really fun project!
The owl is absolutely adorable! Do you make/sell them for those not as creatively inclined?
Awe, thank you very much. No, we don’t make them to sell, we have made several for gifts over the years. So maybe if you showed this post to one of your friends, they would make you one? ?
LOVE IT !!!
Thank you so much for the instructions! I too have been looking for directions and now I have them thanks to your generosity. Yay!