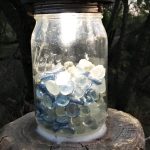
How to Make Mason Jar Lights
Turn a working solar yard light top into a weighted mason jar light for an outdoor table, porch, or garden. The glass gems hold the jar steady and reflect the solar light after dark.
Servings 1 Mason Jar light
Cost $20
Equipment
- Clean cloth
- Small file, optional
- Work gloves, optional
Ingredients
- 1 Top of a Yard solar Light
- 1 wide mouth Mason Jar
- 2 cups glass gems
- 1 Gorilla Glue
Instructions
- Test the solar light.
- Place the solar light in direct sunlight for several hours and check that it turns on after dark.
- Remove the solar light top.
- Unscrew the solar light from its globe and ground stake. Keep the top section containing the solar panel, bulb, and battery compartment.
- Remove the battery.
- Open the battery compartment and remove the rechargeable battery while you work.
- Clean the light.
- Wipe dirt from the bottom of the solar light and allow it to dry completely.
- Fill the mason jar.
- Pour approximately 2 cups of glass gems into the jar, filling it about halfway.
- Check the fit.
- Center the mason jar ring on the bottom of the solar light. Make sure it does not block the battery compartment, switch, or jar threads.
- Glue the ring in place.
- Apply a small amount of weather-resistant adhesive where the metal ring touches the solar light housing. Press the ring into place and wipe away excess glue.
- Let the adhesive cure.
- Leave the solar light and ring undisturbed for the full curing time listed on the adhesive package.
- Replace the battery.
- Reinstall the rechargeable battery and battery cover. If the cover barely touches the jar rim, carefully file only the interfering corners. Do not damage the battery compartment.
- Attach the light to the jar.
- Screw the solar light top and attached ring onto the mason jar. Tighten it gently without forcing it.
- Charge the light.
- Place the finished mason jar light outdoors where the solar panel will receive direct sunlight. It should turn on automatically after dark.
Notes
- Test all parts together before applying glue.
- Keep adhesive away from the battery compartment, switch, solar panel, light sensor, and jar threads.
- Use the same type and voltage of rechargeable battery recommended by the solar light manufacturer.
- Do not use a standard disposable battery unless the manufacturer specifically allows it.
- Clean the solar panel occasionally to remove dust and pollen.
- Move the jar to a sheltered area during severe storms, hail, or freezing weather.
- Outdoor adhesives have different curing times. Follow the directions on the product you use rather than relying only on the estimated project time.