
DIY Dried Orange Slices Garland
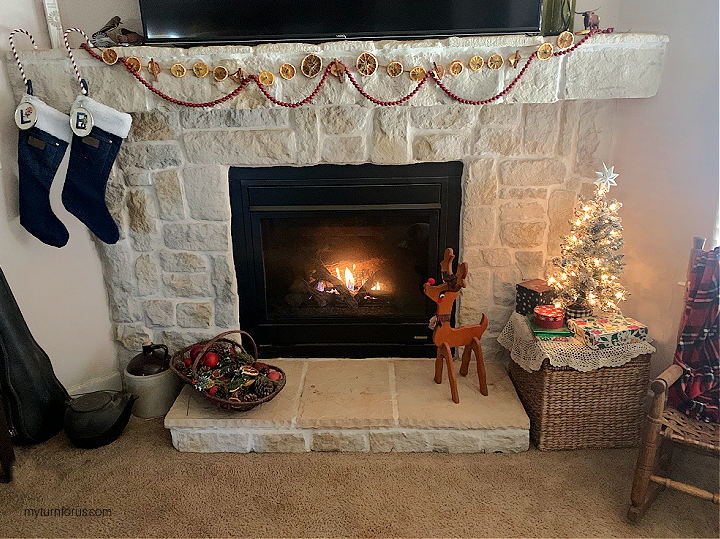
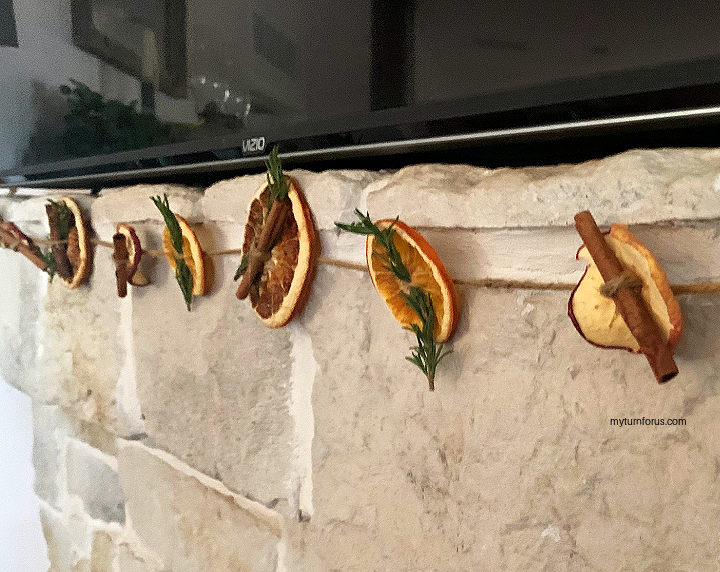
Last Christmas, I dried a big batch of orange slices for my Christmas simmer pots, only to discover I’d cut some of them too thick to fit into the jars. Rather than waste them, I decided to make this dried orange slices garland with a few apple slices, fresh rosemary, and cinnamon sticks. It turned into such a pretty, old-fashioned Christmas decoration for our stone fireplace.
I love using natural materials for Christmas decorating, especially when I already have most of what I need around the house. The oranges and apples add beautiful color, while the rosemary and cinnamon give the garland a simple country Christmas look.
Why I Love This Dried Orange Garland
This is one of those Christmas projects that doesn’t require much money or special equipment.
This post contains affiliate links, which means if you make a purchase, we might receive a small commission at no additional cost to you. Please read our Disclosure Policy.
- Inexpensive to make. Most of the supplies are probably already in your kitchen.
- Beautiful natural colors. The dried oranges turn a lovely golden color, especially when the light shines through them.
- Easy to customize. You can use just oranges or mix in dried apples, cinnamon sticks, and greenery.
- A good way to use leftover dried fruit. That’s exactly how my garland came about!
- Works with country Christmas decor. I especially like how it looks hanging across our stone fireplace.
The fruit takes some time to dry, but assembling the garland is a quick little project once everything is ready.
Key Supplies and Ingredients
I like keeping this garland simple. The fruit is pretty enough on its own, and a few natural additions give it just the right amount of texture.
- Dried orange slices: These are the main decoration. Navel oranges work well, but blood oranges are another pretty option.
- Dried apple slices: I like alternating these with the oranges for a little variety in color and shape.
- Fresh rosemary sprigs: These add greenery and help secure the fruit slices along the twine.
- Cinnamon sticks: They look lovely beside the dried fruit and add another natural element.
- Jute twine: I prefer jute because its rustic appearance works so well with the dried fruit.
- Scissors: For cutting the twine to the length you need.
You’ll also need a small skewer or large needle if the dried fruit doesn’t already have an opening for threading.
How to Make a Dried Orange and Apple Slices Garland
This garland takes a little planning because the fruit needs time to dry, but once your orange and apple slices are ready, putting everything together is easy. Here’s how I made mine.
Step 1. Prepare and Dry the Orange Slices
Start by washing 4 medium oranges and cutting them crosswise into even slices, about ⅛ to ¼ inch thick. Remove any visible seeds and pat the slices dry with paper towels.
You can dry the oranges in either your oven or a food dehydrator.
- Oven method: Arrange the slices in a single layer on parchment-lined baking sheets or an oven-safe wire rack. Dry at your oven’s lowest setting, ideally around 170°F to 175°F, for approximately 4 to 8 hours, turning occasionally.
- Dehydrator method: Place the slices on dehydrator trays without overlapping. Dry at approximately 135°F for 6 to 12 hours, checking periodically.
The drying time depends on how thick you cut your oranges and the equipment you’re using. I like to make sure the slices are completely dry, with no soft or damp areas, before using them in my garland.
Let them cool completely.
Step 2. Prepare and Dry the Apple Slices
Wash 4 large apples and cut them crosswise into slices about ⅛ to ¼ inch thick. Remove any seeds, keeping the pretty star-shaped centers if possible.
To help prevent browning, mix 4 cups of water with ¼ cup lemon juice and 1 teaspoon salt. Soak the apple slices for 5 to 10 minutes, then drain and pat them dry.
- Oven method: Arrange the slices on parchment-lined baking sheets and dry at your oven’s lowest setting, preferably around 170°F, for approximately 4 to 8 hours, turning occasionally.
- Dehydrator method: Arrange the slices on dehydrator trays and dry at 135°F for approximately 6 to 12 hours.
I prefer the apples to be thoroughly dried rather than soft and chewy. They’ll hold up better when hanging on the garland.
Allow them to cool completely before assembling.
Step 3. Cut the Twine and Gather Your Decorations
[Insert orange slice with rosemary image]
Cut a length of jute twine a little longer than the space where you plan to hang your garland. I like leaving some extra at both ends so I have enough to secure it.
Gather your dried orange and apple slices, fresh rosemary sprigs, and cinnamon sticks.
Step 4. Attach the Orange Slices and Rosemary
Thread the jute twine through an opening near the center of a dried orange slice. If there isn’t an opening, carefully make one with a skewer or large needle.
Form a small loop of twine behind the orange slice, slip a rosemary sprig through the loop, and pull the twine snug. The rosemary helps hold the orange in place while adding a little greenery.
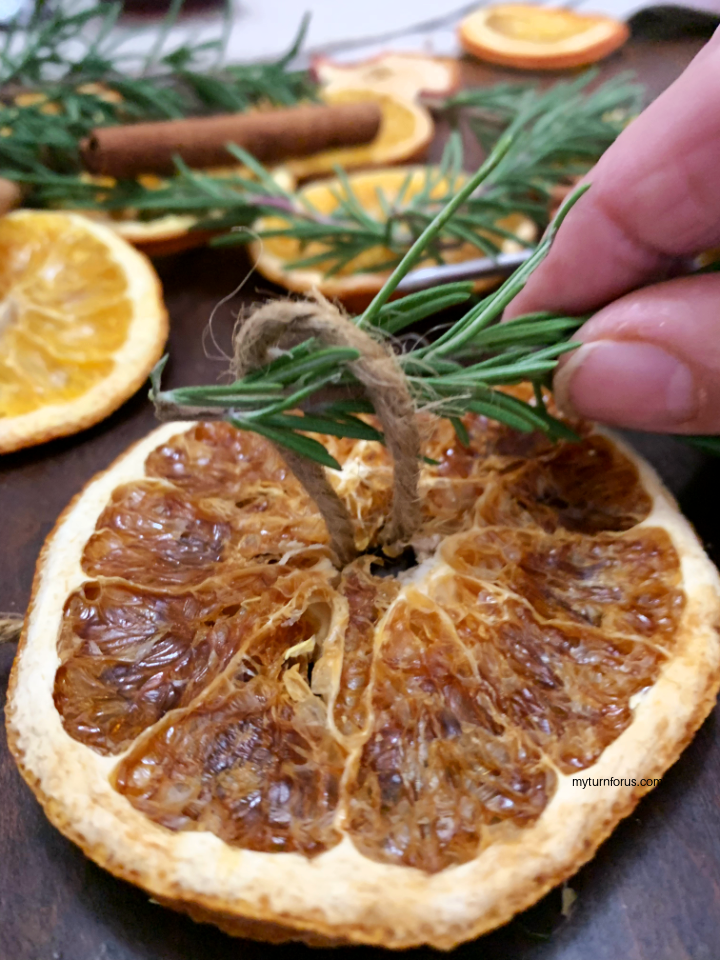
Continue adding orange slices, leaving room between them for the apples and cinnamon sticks.
Step 5. Add the Apple Slices and Cinnamon Sticks
Use the same method for the dried apple slices. Thread the twine through the center, form a small loop behind the slice, and slip a cinnamon stick through it. Pull the twine snug to hold everything in place.
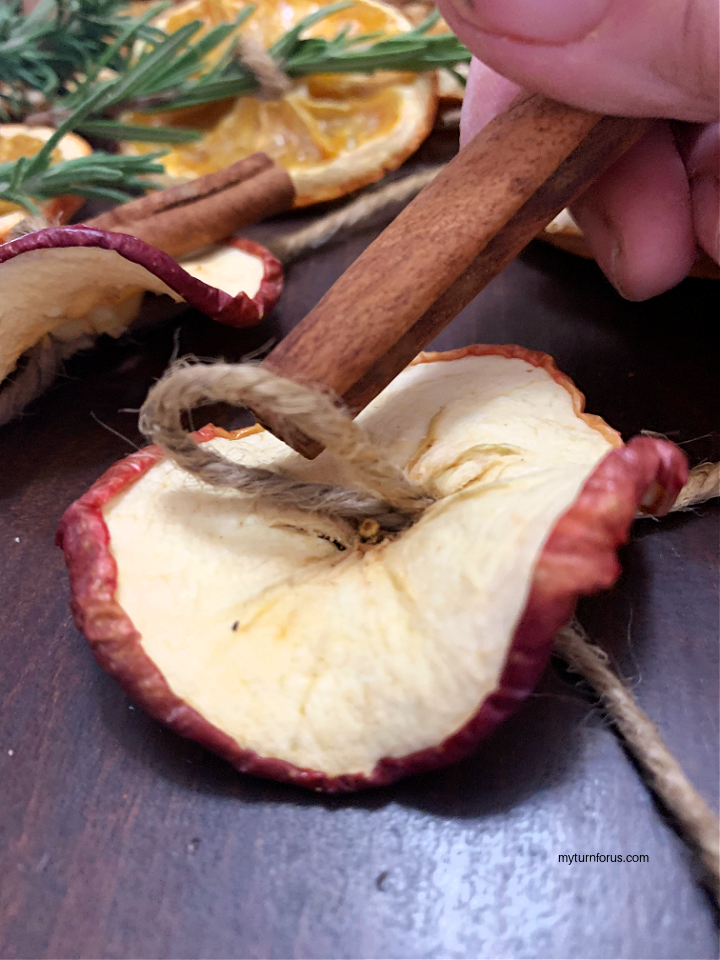
Continue alternating oranges, apples, rosemary, and cinnamon sticks until your garland reaches the length you want.
I like the decorations to look a little irregular rather than perfectly spaced. It gives the garland that old-fashioned, handmade appearance.
Step 6. Hang Your Dried Orange Garland
We hung ours across our stone fireplace, and I love how the natural colors look against the rocks.
I used a few small dabs of hot glue to secure the jute at each end and added extra support behind three of the larger orange slices.
The glue peeled right off our rocks, but I wouldn’t recommend using it on every surface. Small removable hooks are a safer option if you’re concerned about damaging your mantel or walls.
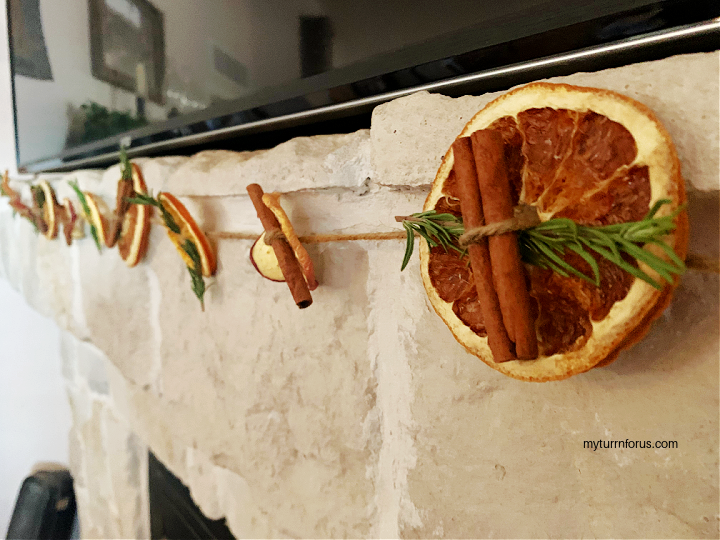
Be sure to hang your garland away from open flames and hot surfaces, especially around a working fireplace.
Expert Tips
There isn’t much that can go wrong with this project, but a few little things make it easier.
- Keep your slices even. Thinner slices dry faster, while thicker slices need more time. Try to keep them close to the same thickness.
- Don’t rush the drying. Any moisture left in the fruit can encourage mold, especially if you plan to store the garland after Christmas.
- Handle dried fruit gently. The slices can become brittle, so take your time when threading the twine.
- Use plenty of twine. I always prefer having a little extra at the ends rather than discovering the garland is too short.
- Be careful with fresh greenery. Rosemary will gradually dry out after the garland is assembled. That’s normal, but it may become brittle and lose some of its color.
- Choose a dry place to display it. Moisture and humidity aren’t good for dried fruit decorations.
More Ways to Make a Dried Orange Garland
I love the simple combination of oranges, apples, rosemary, and cinnamon, but you can change the decorations to suit your Christmas tree or mantel.
Spiced Citrus Garland. Use dried orange and apple slices with cinnamon sticks and whole star anise. This would look especially pretty across a kitchen window or mantel.
Citrus and Greenery Garland. Mix dried orange, blood orange, and grapefruit slices with small pieces of cedar or eucalyptus. Faux greenery is another option if you want something that will hold its appearance throughout the season.
Woodland Christmas Garland. Add small pinecones, wooden beads, and natural wood ornaments between the dried fruit slices. I think this would be lovely with a rustic Christmas tree.
You can also make a garland using only dried orange slices and twine. Sometimes the simplest version is just as pretty.
Frequently Asked Questions
If the fruit is completely dry and the garland is kept away from moisture, it may last through the Christmas season and can sometimes be reused the following year. I would check it carefully before storing or reusing it. Any signs of mold, dampness, or an unpleasant smell mean it’s time to discard the affected decorations.
Yes. You can dry the oranges and apples several days or even weeks before assembling the garland. Keep the dried fruit in airtight containers in a cool, dry place until you’re ready to use it. I would wait to add the fresh rosemary until closer to the time you plan to hang the garland.
Absolutely. If you don’t have time to dry your own fruit, purchased dried orange slices made for crafting can save quite a bit of preparation time. Just make sure they’re completely dry before threading them onto the twine.
Remove any fresh greenery that has become brittle, and make sure the fruit is still completely dry. Store the garland loosely in a dry, protected container with tissue paper between delicate sections. Keep it somewhere cool and away from humidity. I would check it again before using it the following year.
More Homemade Christmas Decorations
If you enjoy decorating with simple, handmade projects, you might also like my Wine Cork Wreath or this Mason Jar Christmas Centerpiece. For a little extra Christmas lighting, try these Christmas Mason Jar Luminaries or my Candy Cane Candlesticks.
A Little Country Christmas Decoration
I still smile thinking about how this garland started with orange slices that wouldn’t fit into my simmer pot jars. Sometimes those little mistakes turn into something worth keeping.
The dried fruit, cinnamon, and rosemary look so pretty together, and I especially enjoy having something handmade hanging across our fireplace at Christmas.
If you make your own dried orange slices garland, I’d love to hear how you decorated yours. Leave me a comment below with a rating star, and don’t forget to save this project to Pinterest for your Christmas decorating.
✂️ Tutorial

Tools
- Sharp knife or mandoline
- Cutting Board
- Food dehydrator or baking sheets
- Paper Towels
- Skewer or large needle (if needed)
Supplies
- Jute string
- Dried Orange slices about 4 oranges
- Dried Apple slices about 4 apples
- Springs of rosemary
- Cinnamon sticks
Instructions
- Prepare the oranges: Wash and cut the oranges crosswise into ⅛ to ¼-inch slices. Remove seeds and pat dry with paper towels.
- Dry the oranges:Arrange in a single layer and dry in the oven at 170°F–175°F for approximately 4–8 hours, turning occasionally. Or use a dehydrator at 135°F for 6–12 hours. Cool completely.
- Prepare the apples: Wash and slice the apples crosswise into ⅛ to ¼-inch rounds. Remove seeds. If desired, soak in a mixture of water, lemon juice, and salt for 5–10 minutes to reduce browning. Drain and pat dry.
- Dry the apples: Arrange in a single layer and dry in the oven at approximately 170°F for 4–8 hours or in a dehydrator at 135°F for 6–12 hours. Cool completely.
- Prepare the garland: Cut a length of jute twine slightly longer than the space you want to decorate. Gather the dried fruit, rosemary sprigs, and cinnamon sticks.
- Attach the oranges: Thread the twine through a small opening in an orange slice. Make a loop behind the slice, slip a rosemary sprig through it, and pull snug to secure.
- Add apples and cinnamon: Repeat with an apple slice, securing a cinnamon stick through the loop. Continue alternating fruit, rosemary, and cinnamon until the garland reaches your desired length.
- Hang the garland: Secure both ends with removable hooks or suitable fasteners. Adjust the fruit slices so they hang naturally.
Notes
- Drying times vary depending on fruit thickness and equipment. All slices should be completely dry before assembling.
- Store leftover dried fruit in an airtight container in a cool, dry place.
- Fresh rosemary will gradually dry out after the garland is assembled.
- Keep the finished garland away from open flames and hot fireplace surfaces.
- Store in a dry location and check carefully for moisture or mold before reusing.
Click HERE to save this dried orange slices garland DIY to Pinterest