Flip Flop Cookies
If you’re looking for a super simple, no-bake (well, almost!) summer treat that brings big smiles, these adorable flip flop cookies are just the thing. Made with classic Nutter Butter cookies and vibrant colored candy melts, they turn out looking like cute little sandals ready for the beach or backyard fun. These decorated flip flop cookies make the sweetest addition to any summer gathering or just a fun treat to brighten up your day!
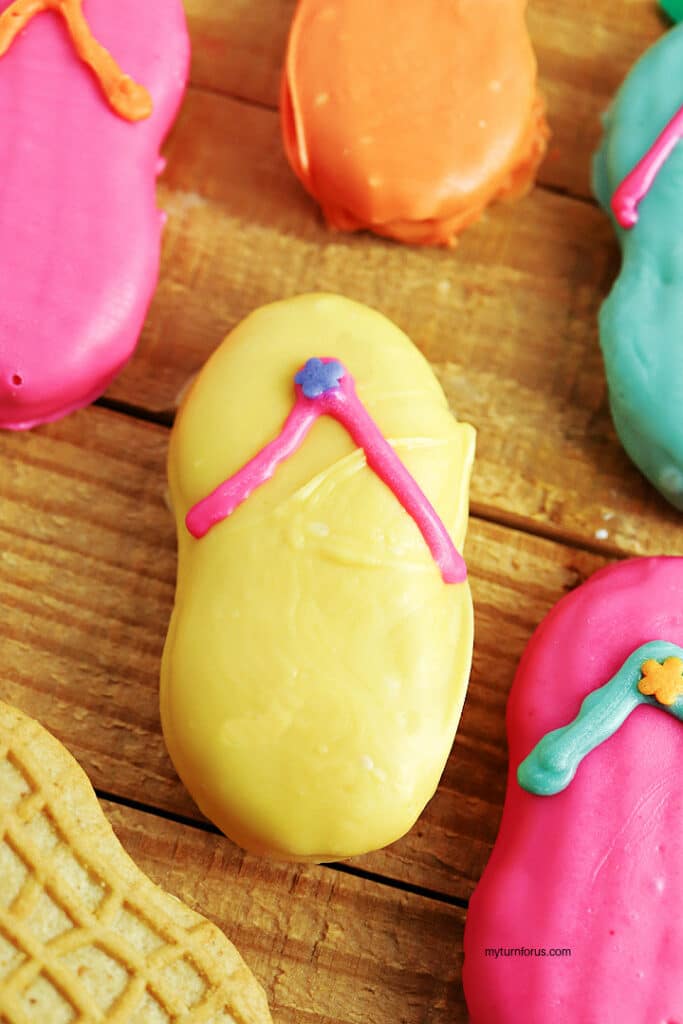
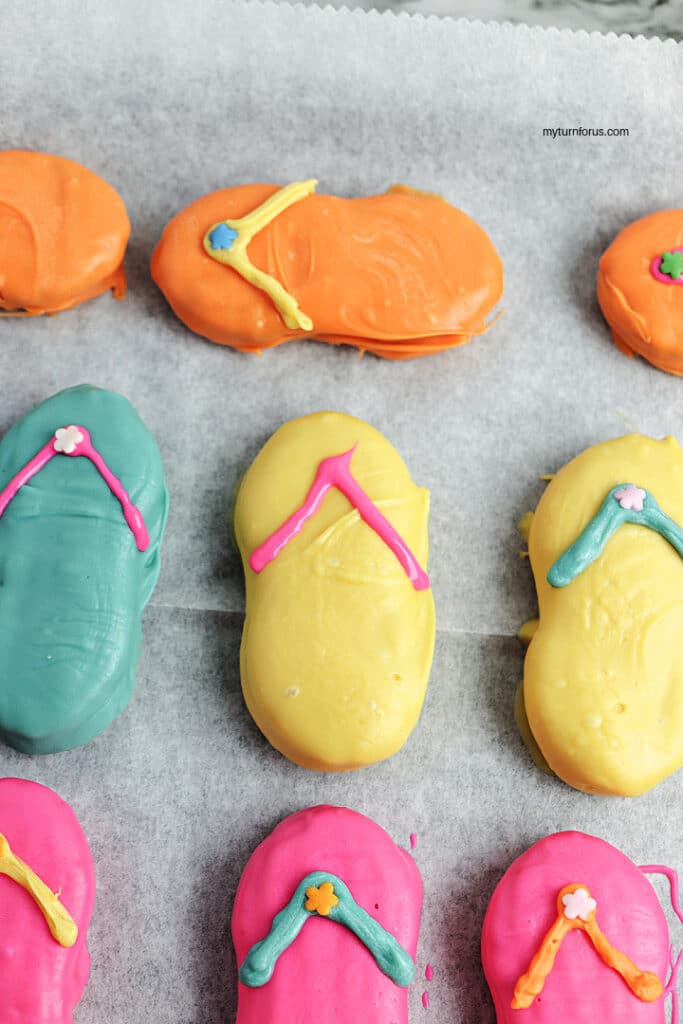
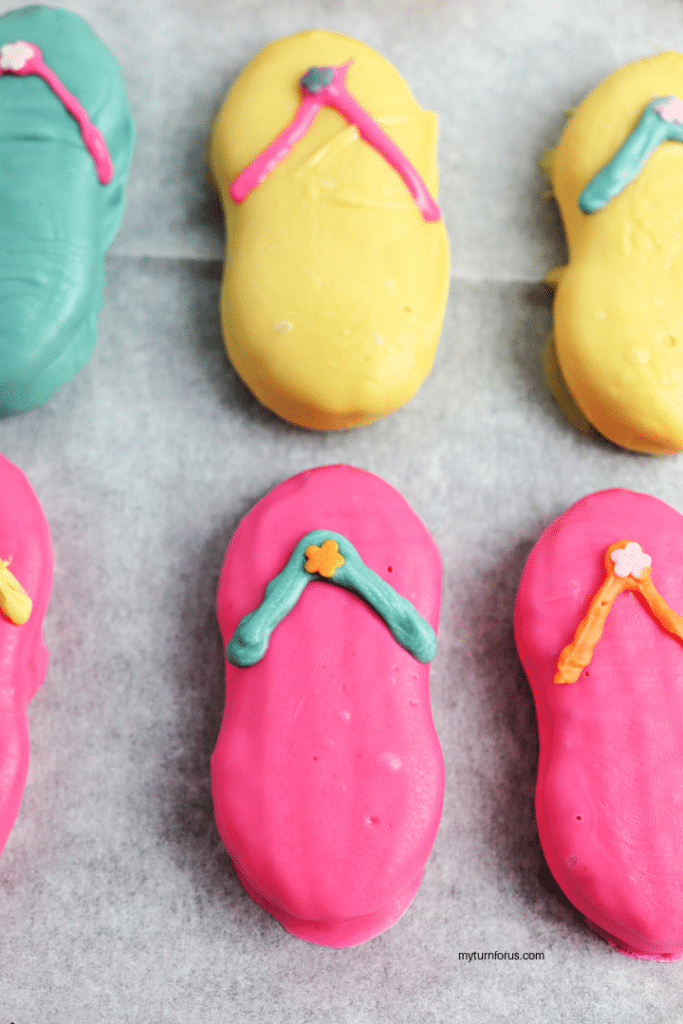
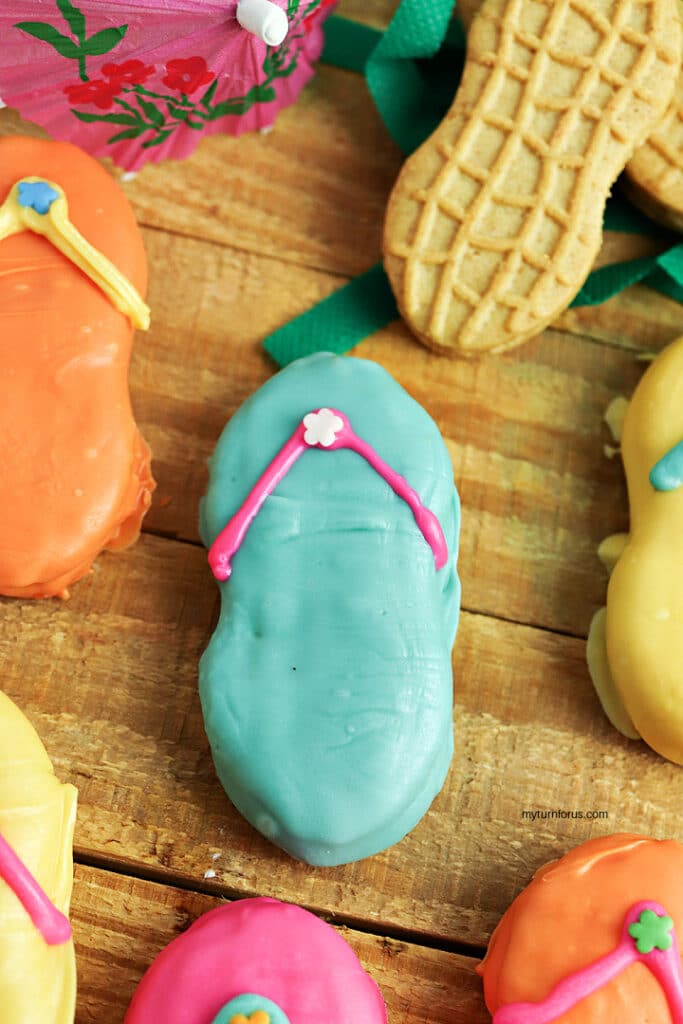
These bright and cheerful flip flop cookies are made with simple Nutter Butter peanut butter cookies dipped in colorful candy melts. Once set, we pipe on sweet “V” shaped straps and finish them with a pretty little flower sprinkle right in the center.
They’re such a fun, no-bake summer treat that’s easy enough for the whole family to help with! Perfect for pool parties, beach-themed get-togethers, or just adding a splash of color to your dessert table.
Crispy peanut butter cookie base with a smooth candy coating — they taste as good as they look!
This post contains affiliate links which means if you make a purchase we might receive a small commission at no additional cost to you.
Perfect for pool parties, 4th of July gatherings, or just a sweet afternoon project with the grandkids, these cheerful cookies are as easy as they are tasty. The peanut butter crunch paired with smooth, melty candy “straps” makes them irresistible—and they’re ready in minutes! Grab your favorite colors and let’s make some flip flops!
Flip Flop Cookies Recipe:
Ingredients:
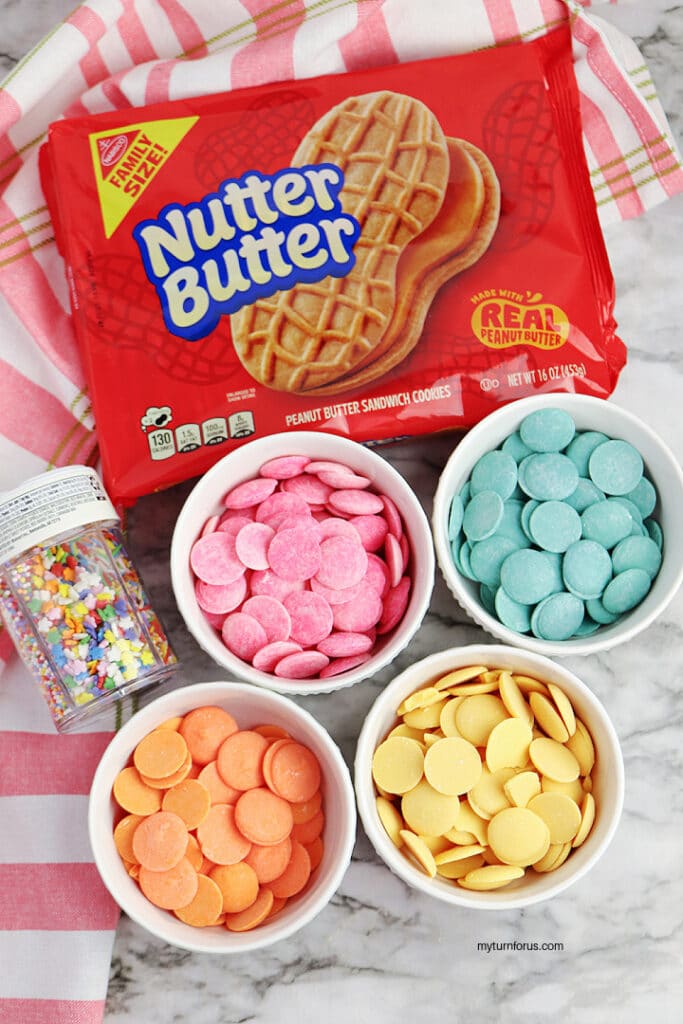
- 24 Nutter Butter cookies
- 1 cup pink melting candy
- 1 cup light blue melting candy
- 1 cup yellow melting candy
- 1 cup orange melting candy
- Flower sprinkles
Equipment Needed:
- 4 microwave safe bowls, I used these ramekins
- fork, for removing the cookie after it is coated
- parchment paper
- Baking sheet
- Piping bag
🥣 Recipe Tips
- Keep the Candy Melts Warm Candy melts set up quickly, so work with one color at a time. If they start to thicken while you’re dipping or piping, pop the bowl or piping bag back in the microwave for 5–10 seconds and stir until smooth again. This makes coating the cookies and drawing those straps so much easier!
- Make the Straps Pop When piping the V-shaped straps, keep the tip of the bag fairly close to the cookie and move at a steady pace. If you want thicker, more defined straps, use a slightly larger snip on the piping bag. The flower sprinkle in the center hides any little wobbles and adds such a sweet, finished look!
- Make Them Ahead of Time These cookies store beautifully! Once fully set, place them in an airtight container with parchment paper between layers. They’ll stay fresh at room temperature for 3–4 days. Perfect for prepping before a party or summer gathering.
- Bonus tip: Let the kids pick their favorite colors and add the sprinkles — they’ll love “designing” their own flip flops!
How to make Decorated Flip Flop Cookies:
Getting Started
- Melt each color of candy melts in its own microwave-safe bowl according to the package instructions. I like to microwave them in 20-30 second intervals, stirring well after each one, until they’re perfectly smooth. Keeping the colors separate makes it so much easier to create those cute flip-flop straps later!
- Once melted, spoon about 2 tablespoons of each color into its own piping bag and set them aside.
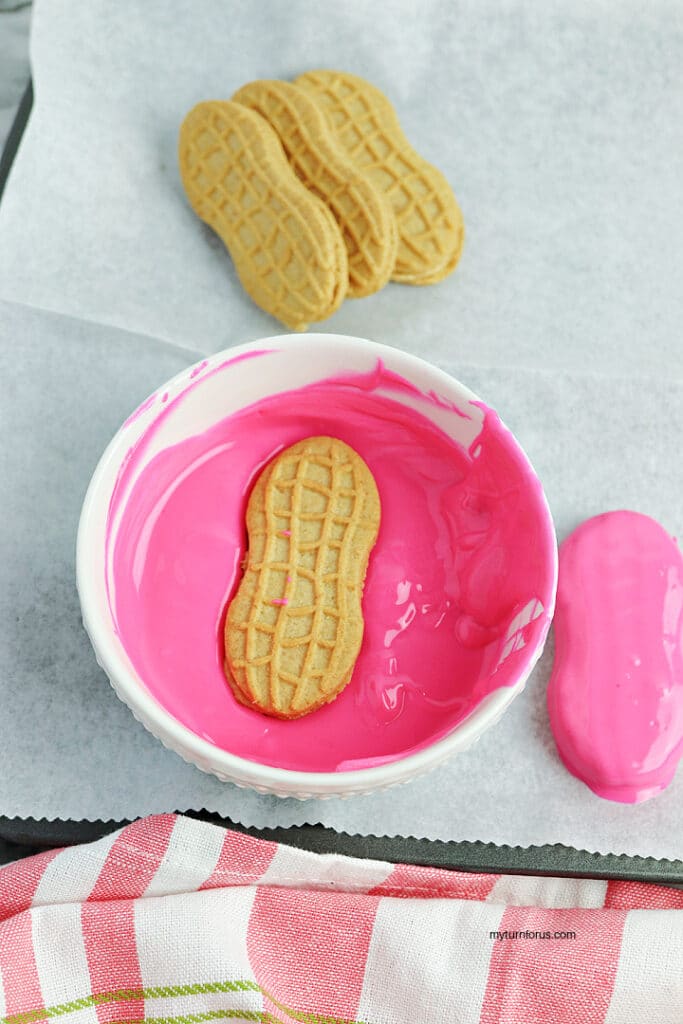
- Dip a Nutter Butter cookie into the melted candy melts until fully coated, then gently lift it out with a fork.
- Lightly tap the fork handle on the edge of the bowl to let the excess drip off.
- Carefully transfer the cookie to a parchment-lined baking sheet to cool and set.
- Repeat the process until you have six cookies in each color.
Pro tip: Keep them warm while you work so they stay nice and dippable.
- Once all your chocolate-coated cookies have cooled and hardened completely, gently remelt the candy in the piping bags. You can do this by placing the bags in a bowl of warm (not hot) water for a few minutes or microwaving them in very short 5-10 second bursts, kneading the bag between each one until smooth again.
- Snip a small tip off the end of each piping bag.
- On each cookie, pipe a gentle “V” shape at the top to create the look of flip-flop straps. Start from one side near the top edge, pipe down toward the center, then back up to the other side. Don’t worry about making them perfect—slightly wavy or imperfect straps look even more charming and handmade!
- While the candy is still soft, lightly press one pretty flower sprinkle right into the center of each “V” to make a sweet little decoration.
- Leave your beautiful Nutter Butter flip flop cookies right on the parchment paper to cool and harden completely. This usually takes about 15-30 minutes at room temperature, depending on how warm your kitchen is.
- For faster setting, you can pop the whole tray into the refrigerator for 10-15 minutes. Just don’t leave them in too long—Nutter Butters taste best at room temperature!
- Once the candy melts have fully hardened, they’re ready to serve. The chocolate will be nice and snappy, and those cute little straps will stay perfectly in place.
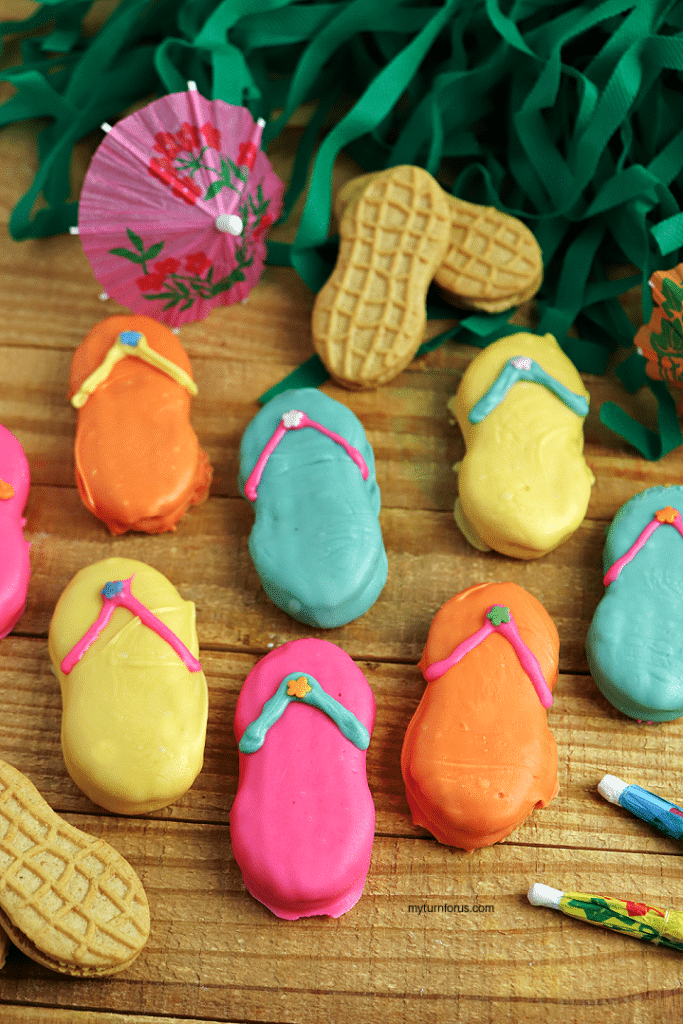
Your adorable Nutter Butter flip flop (or sandal) cookies are all finished and ready to enjoy. These sweet little treats turn out so cute and colorful — they always bring smiles wherever they go.
Whether you’re making them for a summer pool party, backyard barbecue, 4th of July celebration, or just because, they’re a fun and easy way to add a little sunshine to your day. The kids (and grown-ups!) love helping decorate them, and they taste as good as they look.
Store any leftovers in an airtight container at room temperature for up to a few days. Though around our house, they rarely last that long!
I hope you have as much fun making these decorated flip flop cookies as we do. Don’t forget to Pin this recipe for later. Happy summer, friends — go flip some flops! 🩴🍪
Other Fun Cookie Recipes:
🥣 Recipe

Equipment
- 4 Microwave safe bowls I used these ramekins
- fork, for removing the cookie after it is coated
Ingredients
- 24 Nutter Butter cookies
- 1 cup pink melting candy
- 1 cup light blue melting candy
- 1 cup yellow melting candy
- 1 cup orange melting candy
- Flower sprinkles
Instructions
- Melt each color of candy melts in its own microwave-safe bowl according to the package instructions. I like to microwave them in 20-30 second intervals, stirring well after each one, until they’re perfectly smooth. Keeping the colors separate makes it so much easier to create those cute flip-flop straps later!
- Once melted, spoon about 2 tablespoons of each color into its own piping bag and set them aside.
- Dip a Nutter Butter cookie into the melted candy melts until fully coated, then gently lift it out with a fork.
- Lightly tap the fork handle on the edge of the bowl to let the excess drip off.
- Carefully transfer the cookie to a parchment-lined baking sheet to cool and set.
- Repeat the process until you have six cookies in each color.
- Once all your chocolate-coated cookies have cooled and hardened completely, gently remelt the candy in the piping bags. You can do this by placing the bags in a bowl of warm (not hot) water for a few minutes or microwaving them in very short 5-10 second bursts, kneading the bag between each one until smooth again.
- Snip a small tip off the end of each piping bag.
- On each cookie, pipe a gentle “V” shape at the top to create the look of flip-flop straps. Start from one side near the top edge, pipe down toward the center, then back up to the other side. Don’t worry about making them perfect—slightly wavy or imperfect straps look even more charming and handmade!
- While the candy is still soft, lightly press one pretty flower sprinkle right into the center of each “V” to make a sweet little decoration.
- Leave your beautiful Nutter Butter flip flop cookies right on the parchment paper to cool and harden completely. This usually takes about 15-30 minutes at room temperature, depending on how warm your kitchen is.
- For faster setting, you can pop the whole tray into the refrigerator for 10-15 minutes. Just don’t leave them in too long—Nutter Butters taste best at room temperature!
- Once the candy melts have fully hardened, they’re ready to serve. The chocolate will be nice and snappy, and those cute little straps will stay perfectly in place.
Nutrition