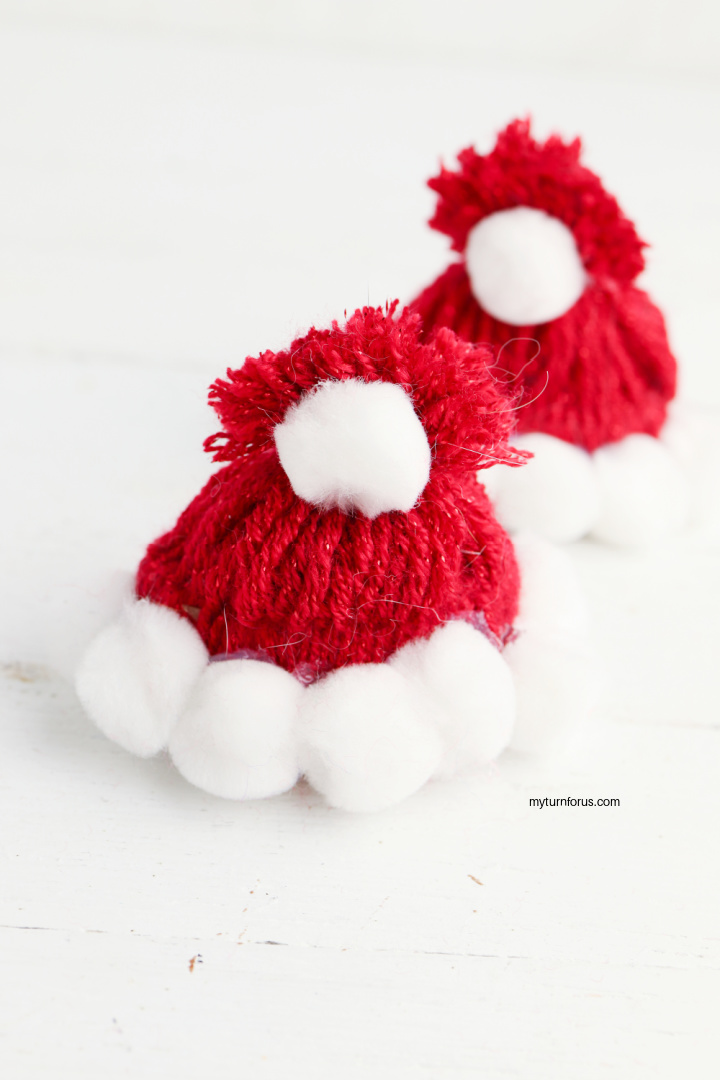
Mini Santa Hats Craft
Sprinkle some jolly whimsy onto your holiday tree or gift packages with these adorable Mini Santa Hats! Crafted from simple red yarn wrapped around a cardboard tube, fluffy white pom-poms, and a dash of hot glue, these no-sew ornaments come together in under an hour—perfect for kids (with a grown-up glue hand) or last-minute festive fun.

These yarn-wrapped Santa hats are ridiculously inexpensive, no-sew, and needle-free—just wrap red yarn around a cardboard tube, cinch the top, and hot-glue tiny white pompoms for the cuff and tip. They come together in minutes and look absolutely adorable. Perfect grown-up craft or a fun project for kids (with a grown-up handling the hot glue gun). One roll of yarn + a few pompoms = pure Christmas magic!
Hang these little cuties on your tree, perch them on top of wrapped gifts, or string them into a merry garland—these mini Santa hats add instant twinkle and Santa-level sparkle wherever they go. And yes, they’re made from toilet paper rolls. Who knew your bathroom stash was secretly holiday gold?
This post contains affiliate links which means if you make a purchase we might receive a small commission at no additional cost to you.

These adorable mini Santa hats look absolutely darling dangling from your Christmas tree or perched atop wrapped gifts like tiny jolly elves. In just a couple of hours you can whip up a whole cheerful army of them—perfect for spreading holiday magic everywhere!
We used a paper towel tube (cut into sections), but toilet paper rolls work just as brilliantly. Hang them as twinkly ornaments, use them as package toppers, or scatter them around the house for instant Santa sparkle. Who knew something from the bathroom could turn into the cutest Christmas craft ever?
What you need for this Mini Santa Hats Craft:
Supplies:
- Cardboard tube (I used a paper towel roll)
- Red yarn
- White pompoms
Equipment:
- Scissors
- Hot Glue Gun
🧶Tutorial Tips
- Yarn-wrapping wizardry for flawless coverage – Before starting, lightly spritz the cardboard tube with water in a spray bottle to help the yarn “grab” and stay put without slipping. Wrap the yarn taut and slightly overlapping each loop (aim for 20–25 pieces total per hat), rotating the tube as you go—this ensures even, gap-free red fluff that looks professionally pom-pom perfect from every angle.
- Knot-tying hack for sturdy, no-fuss shaping – When gathering the yarn for the hat’s crown, use a double-knot with a spare 4-inch yarn scrap (in white for stealth) to cinch it tight—then trim the scrap flush after. This prevents loosening during glue-up and gives you a hidden “anchor” point that’s way more secure than a single tie, especially if little hands are helping.
- Pompom perfection without glue disasters – Dab a tiny dot of hot glue on your fingertip (or a toothpick) first, then press each pompom into place—sparingly, so it doesn’t ooze onto the yarn and stiffen it. Let each glue spot cool 10 seconds before adding the next; for the top pompom, glue over the knot for extra reinforcement.
Pro move: Test a scrap hat first to nail your glue rhythm and avoid any sticky Santa surprises!
How to make these small Santa hats for ornaments:
- Get started by cutting a big stack of red yarn into 6-inch pieces (the more the merrier—aim for 20–25 per hat).
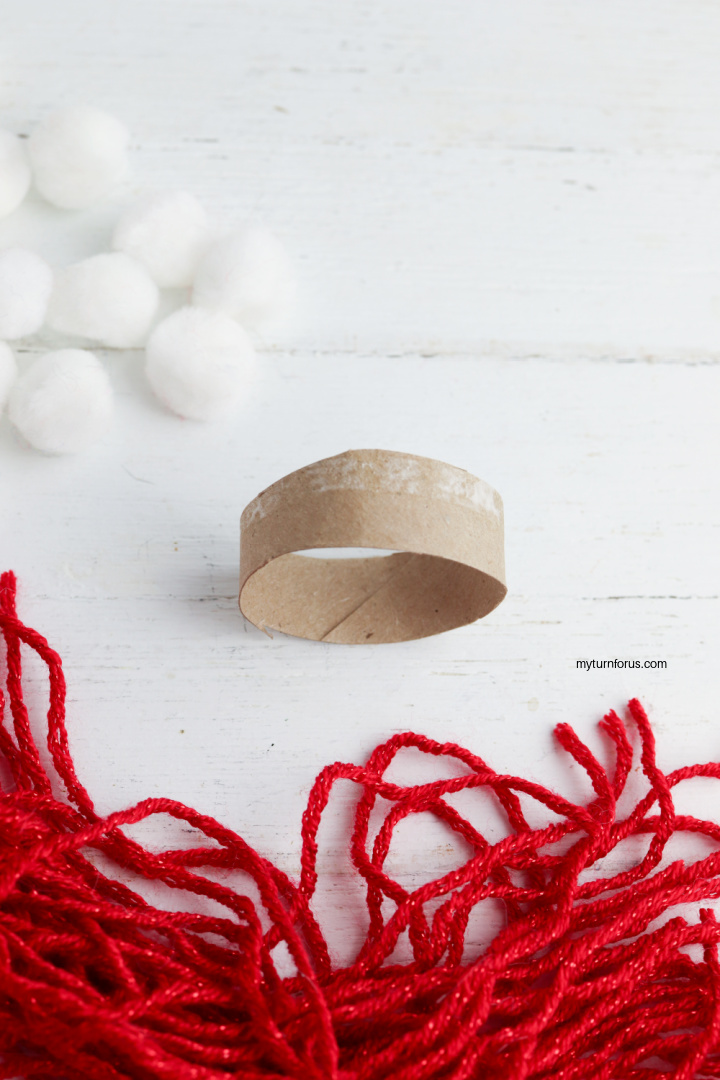
- Then, slice your cardboard tube (toilet paper or paper towel roll) into 1-inch wide rings—one ring makes one perfect little Santa hat!

- Take one 6-inch piece of red yarn and fold it in half to make a little loop. Slip that loop through the inside of your cardboard ring so it pokes out the top about an inch.
- Reach through the loop and grab the two loose ends, then pull them snugly through the loop and down the outside of the ring. Boom—one perfectly anchored strand wrapped around the tube! Repeat this lark’s head knot all the way around and you’re already on your way to Santa hat glory.

- Keep going: add more folded yarn pieces, sliding the loop through the inside of the ring and pulling the ends through the loop on the outside, until every bit of cardboard is completely hidden under a fluffy red coat.
- Push the strands snugly together as you work—no gaps allowed!
- Once the ring is fully covered, you’ve got the perfect Santa-hat tube ready for the next step.

- Lay your yarn-covered ring flat on the table and give all those red strands a gentle fluff and straighten so they look nice and even.
- Slide a fresh piece of yarn (about 10–12 inches long) underneath the ring right in the middle. Grab both ends, pull them up over the top, and tie a tight double knot—this cinches everything together and magically turns your fuzzy tube into an adorable little Santa hat shape.

- Snip the two long ends of the tying yarn flush with the knot (no fuzzy tails allowed!).
- Now give the top of your mini hat a quick haircut—trim the red yarn into a cute rounded or slightly pointy pom-pom shape. A few strategic snips and suddenly it’s looking like Santa himself left it on your craft table!
- Fire up your hot glue gun (low-temp is safest for little helpers).
- Run a thin line of glue around the bottom edge of the hat and press white pom-poms all the way around to create Santa’s fluffy brim—snug them right up against each other for maximum coziness.
- Add one final pom-pom right on top where the yarn is tied. Dab a dot of glue, press it on, hold for 5 seconds, and voilà—your mini Santa hat now has the perfect snowy crown!

- To turn your mini Santa hat into an ornament, simply cut a 10-inch piece of red (or white) yarn, wrap it once around the top just under the pompom, tie a tight knot to secure it, then bring the ends together and knot again to form a hanging loop.
- Trim any excess, and it’s ready to dangle merrily from the tree!
And there you have it: the cutest, coziest little Santa hats ever, made from humble toilet paper rolls and a whole lot of holiday cheer! In under an hour you’ve turned everyday supplies into ornaments that make your tree (or presents, or mantel) sparkle with handmade magic. Hang them high, gift them proudly, and let every tiny hat remind you that the sweetest decorations come straight from the heart. Happy crafting and merry everything!
3 fun twists on the Mini Santa Hats craft
- Mini Elf Hat Ornaments
Swap the red yarn for bright green. Wrap the tube the same way, cinch the top, and trim the gathered yarn into a cute zigzag edge instead of covering it with a pompom. Glue a tiny gold jingle bell (or yellow pompom) to the pointy tip and add a skinny white yarn cuff at the bottom. Hang a cluster on the tree for the cutest little North-Pole crew. - Scandinavian Gnome (Tomte) Hats
Use soft gray or dusty-rose yarn for a cozy hygge look. Wrap extra-loosely for a slouchy effect, tie the top loosely so it flops over, and glue a medium white pompom to the bottom front as the gnome’s beard. Add a tiny wooden bead nose peeking out. These look adorable lined up on a mantel or tucked into a wreath. - Candy-Cane Stripe Mini Hats
Alternate red and white yarn every 5–6 wraps for classic candy-cane stripes (secure color changes with a tiny dab of glue on the inside). Finish with a white pompom on top and a white cuff. Group a bunch together in a bowl or string them as a playful garland—perfect for a peppermint-themed tree or hot-cocoa station.
All three use the exact same supplies and technique – just change the colors and pompom placement for instant new characters!
🧶Tutorial
Equipment
Ingredients
- Cardboard tube I used a toilet paper roll
- Red yarn
- White pompoms
Instructions
- Get started by cutting a big stack of red yarn into 6-inch pieces (the more the merrier—aim for 20–25 per hat).
- Then, slice your cardboard tube (toilet paper or paper towel roll) into 1-inch wide rings—one ring makes one perfect little Santa hat!
- Take one 6-inch piece of red yarn and fold it in half to make a little loop. Slip that loop through the inside of your cardboard ring so it pokes out the top about an inch.
- Reach through the loop and grab the two loose ends, then pull them snugly through the loop and down the outside of the ring.
- Boom—one perfectly anchored strand wrapped around the tube! Repeat this lark’s head knot all the way around and you’re already on your way to Santa hat glory.
- Keep going: add more folded yarn pieces, sliding the loop through the inside of the ring and pulling the ends through the loop on the outside, until every bit of cardboard is completely hidden under a fluffy red coat.
- Push the strands snugly together as you work—no gaps allowed! Once the ring is fully covered, you’ve got the perfect Santa-hat tube ready for the next step.
- Lay your yarn-covered ring flat on the table and give all those red strands a gentle fluff and straighten so they look nice and even.
- Slide a fresh piece of yarn (about 10–12 inches long) underneath the ring right in the middle. Grab both ends, pull them up over the top, and tie a tight double knot—this cinches everything together and magically turns your fuzzy tube into an adorable little Santa hat shape.
- Snip the two long ends of the tying yarn flush with the knot (no fuzzy tails allowed!).
- Now give the top of your mini hat a quick haircut—trim the red yarn into a cute rounded or slightly pointy pom-pom shape. A few strategic snips and suddenly it’s looking like Santa himself left it on your craft table!
- Fire up your hot glue gun (low-temp is safest for little helpers). Run a thin line of glue around the bottom edge of the hat and press white pom-poms all the way around to create Santa’s fluffy brim—snug them right up against each other for maximum coziness.
- Add one final pom-pom right on top where the yarn is tied. Dab a dot of glue, press it on, hold for 5 seconds, and voilà—your mini Santa hat now has the perfect snowy crown!
- To turn your mini Santa hat into an ornament, simply cut a 10-inch piece of red (or white) yarn, wrap it once around the top just under the pompom, tie a tight knot to secure it, then bring the ends together and knot again to form a hanging loop. Trim any excess, and it’s ready to dangle merrily from the tree!
Click HERE to save this mini Santa hats craft to Pinterest