
DIY Popcorn Christmas Ornament
I’ve always loved the old-fashioned look of popcorn on a Christmas tree. Popcorn garlands have been around forever, but this little DIY popcorn Christmas ornament gives me that same nostalgic look without having to string a single piece of popcorn.
The fun part is that the popcorn actually pops right inside the clear glass ornament. Add a simple red ribbon when it is finished, and you have an inexpensive Christmas ornament that feels right at home on a traditional tree.
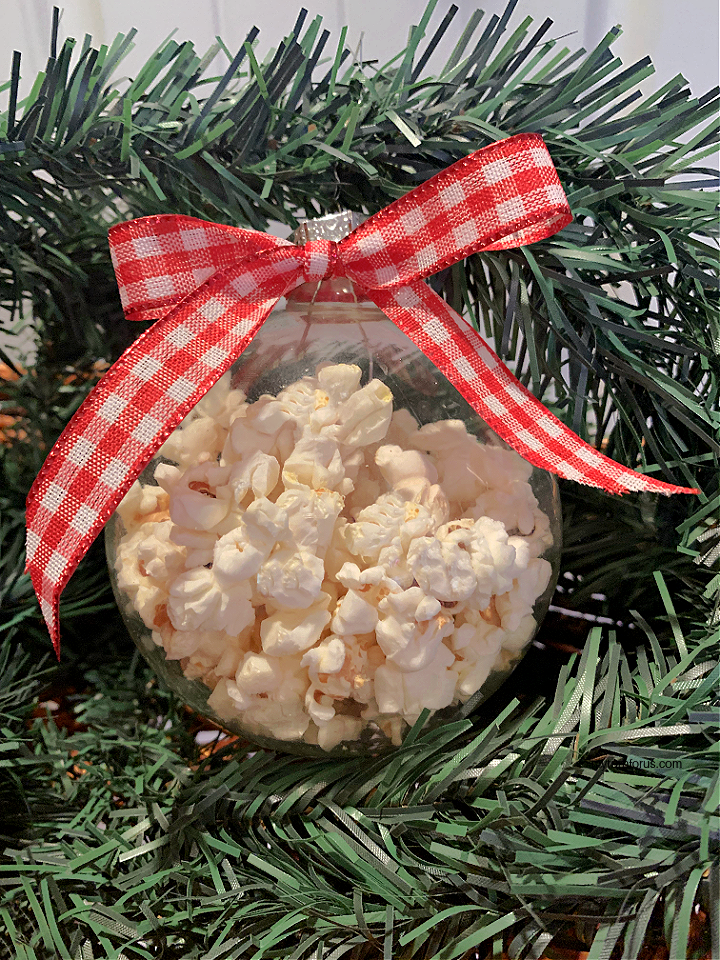
I used 4-inch clear glass ornaments for mine. You could use another size, but the larger ornament gives the popcorn room to expand and makes a pretty statement on the tree.
This post contains affiliate links, which means if you make a purchase, we might receive a small commission at no additional cost to you. Please read our Disclosure Policy.
Why I Love These Popcorn Ornaments
This is one of those little Christmas projects that looks much more interesting than the amount of work involved.
- You only need three basic supplies.
- Each ornament takes just a few minutes to make.
- The popcorn gives it a charming, old-fashioned Christmas look.
- You can change the ribbon to coordinate with your Christmas decorations.
- They look pretty individually or grouped together on the tree.
And because the popcorn is contained inside the ornament, you still get that vintage popcorn look without worrying about a garland breaking apart.

Key Supplies:
You only need a few things for this project.

Clear glass balls: I used a 4-inch glass ball. It needs to be actual glass because plastic can melt in the microwave.
Popcorn kernels: Regular unpopped popcorn is all you need. One tablespoon was enough for my 4-inch ornament.
Ribbon: I used red and white gingham ribbon because I love how it looks with the popcorn and Christmas greenery.
You will also need a small funnel, brown paper lunch bag, measuring spoon, scissors, and a microwave.
Important safety note
Remove the metal ornament cap before putting the glass ornament in the microwave. I also place the ornament inside a brown paper bag while it pops. Thin decorative glass can break, so inspect the ornament first for cracks or chips and handle it carefully. A paper bag does not make non-microwave-safe glass safe to heat.
How to Make a Popcorn Christmas Ornament
The complete instructions are in the how-to card below, but here is how I make mine step by step.
Step 1: Add the popcorn kernels
Remove the metal cap from the clear glass ornament.
Place a small funnel into the opening and measure 1 tablespoon of popcorn kernels into the ornament.

You don’t need very much. The popcorn needs room to expand as it pops.
Step 2: Place the ornament in a paper bag
Carefully slide the glass ornament into a brown paper lunch bag with the opening of the ornament facing upward.

I don’t skip the paper bag. If the glass happens to break, the bag may help contain some of the pieces. I have not had one break, but thin glass always needs to be handled carefully.
Step 3: Microwave until the popcorn slows down
Fold the top of the paper bag closed and place it in the microwave.
Microwave on high for about 1 minute, listening closely to the popcorn. Just like regular microwave popcorn, stop when the popping slows down.

Microwaves vary, so I pay more attention to the sound than the clock.
Step 4: Let the ornament cool completely
Leave the ornament inside the paper bag in the microwave until it has cooled.
The glass will be very hot, so don’t rush this part.

Once it is cool enough to handle safely, remove the bag from the microwave and carefully take out the ornament.
Step 5: Remove the unpopped kernels
Once the glass ornament is completely cool, turn it upside down and gently shake out any kernels that did not pop.
You should now have a clear ornament filled with fluffy white popcorn.

Step 6: Replace the cap and add ribbon
Replace the metal cap.

Tie a ribbon around the neck of the ornament or attach ribbon to the hanger at the top. I used red gingham because I like that simple country Christmas look.
Then it is ready for the tree.
Expert Tips
This is a simple project, but there are a few things worth knowing before you begin.
- Use the right glass. The original project uses a decorative glass ornament, but ordinary Christmas ornament glass is not necessarily microwave-safe. Heating it can cause cracking or shattering, so this method should not be treated as safe without confirmation from the ornament manufacturer.
- Don’t add too many kernels. I use about one tablespoon in a 4-inch ornament. You want enough room for the popcorn to expand.
- Always remove the metal cap first. Nothing metal should go into the microwave.
- Let the glass cool naturally. Going from very hot to cold too quickly can stress glass, so I leave mine alone until it has cooled completely.
Simple Ways to Change the Look
I would keep the ornament itself simple and change the ribbon instead.
A red gingham ribbon gives it the old-fashioned country Christmas look I used here. Red velvet would make it a little dressier, while baker’s twine would give it an even more rustic look.
You could also make several matching ornaments using different sizes of clear glass balls. I think a group of them tucked among Christmas greenery would be especially pretty.
Frequently Asked Questions
Not for the microwave method. Plastic ornaments may melt or become damaged when heated. For a safer alternative, use a plastic ornament and fill it with popcorn that has already been popped and cooled.
I use about 1 tablespoon of popcorn kernels for a 4-inch glass ornament in the original project. Adding more isn’t necessary and may leave too little room for the popcorn to expand.
The original project uses a bag to help contain the ornament and any broken pieces if the glass cracks. However, a paper bag cannot prevent the ornament from breaking or eliminate the risk of injury.
Yes. Once the ornament is completely cool and sealed with its cap, I pack mine away carefully with the rest of the Christmas ornaments. The popcorn is decorative at this point, of course, so don’t plan on eating it later.
More Homemade Christmas Crafts
If you enjoy Christmas decorations with that homemade, old-fashioned feel, you might also like my Wine Cork Wreath, Rustic Christmas Card Holder, or Mini Santa Hats. And my Christmas Simmer Pot is another simple way I like to bring a little Christmas tradition into the house.
There is no need to make this one complicated. A glass ornament, some popcorn, and a pretty ribbon are really all it takes.
If you make one of these DIY popcorn Christmas ornaments, I’d love to hear how yours turned out. Leave me a comment below or tag me on Instagram so I can see it.
✂️ Tutorial


Tools
- Small Funnel
- measuring spoon
Supplies
- 1 4 inch glass ornament ball Never use plastic
- 1 Tablespoon Popcorn
- Ribbon of your choice
Instructions
- Remove the metal cap from the glass ornament. Using a small funnel, pour 1 tablespoon of popcorn kernels inside.
- Carefully place the ornament inside a brown paper lunch bag, keeping the ornament opening facing upward.
- Fold the bag closed and microwave on high for approximately 1 minute, stopping when the popping slows down.
- Leave the ornament inside the bag until the glass has cooled completely.
- Carefully remove the ornament and gently shake out any unpopped kernels.
- Replace the metal cap and tie a pretty ribbon around the neck of the ornament. Hang it on your Christmas tree.
Notes
- Safety: These instructions describe the original project, but ordinary decorative glass ornaments are not microwave-safe unless the manufacturer specifically says so. The glass can crack or shatter, and a paper bag does not eliminate that risk.
- Safer alternative: Pop the popcorn separately, allow it to cool, and fill a clear plastic ornament with pieces small enough to fit through the opening.
- Store finished ornaments carefully with your Christmas decorations. The popcorn is for decoration only.
Click HERE to save this glass popcorn Christmas ornament to Pinterest