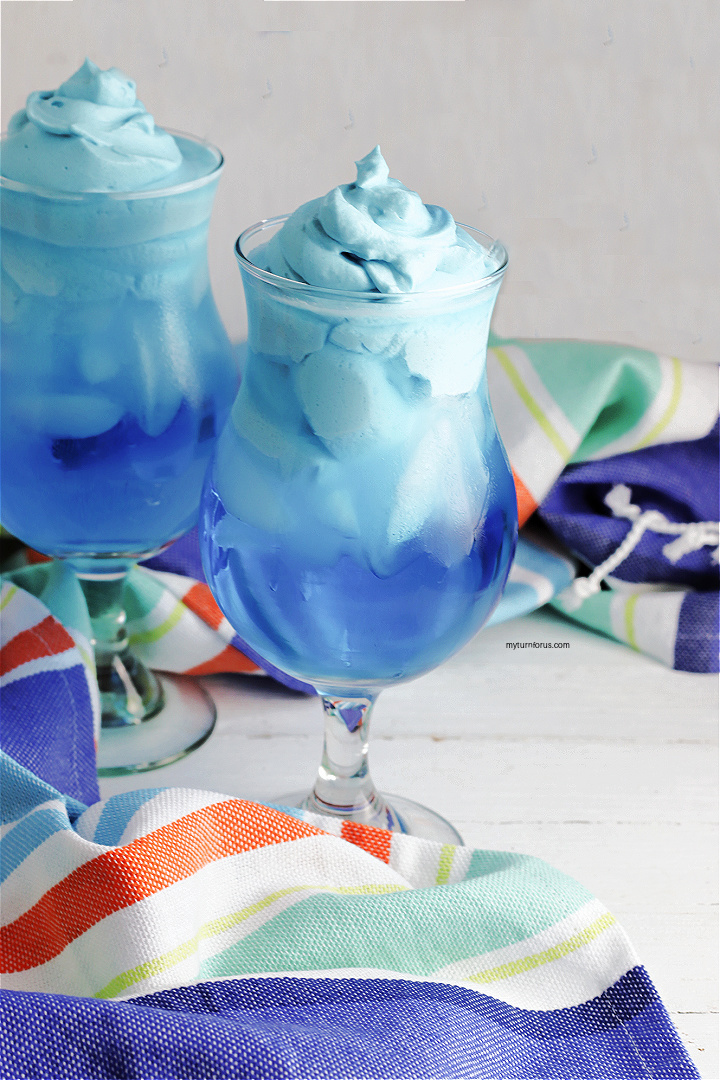
Blue Kool-Aid Whipped Drink Recipe
Try this fun Blue Kool-Aid Whipped Drink Recipe a kid-friendly summer beverage inspired by Dalgona coffee and whipped lemonade trends. It whips heavy cream with Kool-Aid powder and sugar into a fluffy topping, served over ice and prepared Kool-Aid (customizable with any flavor or color).

Last fall and winter, the viral Dalgona coffee trend took over, with that fluffy whipped texture showing up in coffee and even hot chocolate. This summer, the craze has shifted to whipped lemonade and whipped Kool-Aid — perfect for kids! And if you’ve been curious about how to make this colorful, refreshing whipped drink everyone’s talking about, you’re in the right spot. All it takes is a couple packets of Kool-Aid and some heavy whipping cream to create this delicious blue treat.
This post contains affiliate links which means if you make a purchase we might receive a small commission at no additional cost to you.

Get ready to whip up this super-fun Blue Kool-Aid Whipped Drink — easily one of the best Kool-Aid recipes you’ll ever try! It’s completely kid-approved and perfect for summer, but let’s be honest: it’s just as irresistible for us big kids too. With Kool-Aid’s endless variety of bright colors and flavors, you can customize it however you want — the possibilities are truly endless. Also it’s quick to make in 10 minutes, it’s perfect for cooling off on hot days—just stir and enjoy!
Ready to make your own fluffy, blue whipped drink today? Let’s dive in!
What’s in the blue kool-aid whipped drink:
Ingredients:
- 1 packet Kool-Aid (We used mixed berry)
- ⅓ cup sugar
- ½ cup heavy whipping cream
- For serving:
- 1 packet Kool Aid, prepared according to package instructions
- Ice
Equipment Needed:
- Large Bowl
- Mixer
- 2 Tulip shaped glasses
🥣 Recipe Tips
- Chill everything for maximum fluff — Keep your heavy whipping cream as cold as possible (straight from the fridge, or even chill the bowl and beaters/whisk for 10–15 minutes beforehand). Cold ingredients whip up faster and hold more air, giving you that ultra-fluffy, stable Kool-Aid whipped topping that mounds beautifully without deflating quickly. If the cream is even slightly warm, it can turn soupy instead of cloud-like.
- Watch the whipping stages closely to avoid over-beating — Start on medium speed to combine the Kool-Aid powder and sugar without splashing, then crank to high and stop as soon as you hit stiff peaks (the cream stands straight up with a glossy finish and the tip holds its shape). Over-whipping turns it grainy or separates into buttery clumps—check every 30 seconds after the first couple of minutes. A quick test: lift the beaters; if the peak stands firm without drooping, you’re golden.
- Layer and stir strategically for the best sip experience — Don’t fill the tulip glasses all the way with ice—leave that top third open so the generous mound of whipped cream sits proudly on top without overflowing. When stirring, go gentle and partial: aim for pretty marbled swirls and streaks of blue and white rather than fully mixing everything in. This keeps some fluffy pockets intact, so every sip starts refreshing and tangy, then gets creamier and sweeter as you go, making the drink feel extra luxurious and fun.
Here’s how to make this fun whipped kool-aid:

Step 1: Prepare the whipped topping mixture
- Grab a large mixing bowl (a stand mixer bowl or a deep bowl suitable for electric beaters works best).
- Pour in the heavy whipping cream (make sure it’s very cold straight from the refrigerator for the best volume).
- Add one full packet of your chosen Kool-Aid powder (for the blue version, use the blue raspberry or your preferred blue-colored flavor).
- Then sprinkle in the granulated sugar — this helps sweeten the whipped cream and balances the tangy Kool-Aid flavor.
Now you’re ready to whip everything together into that light, fluffy, cloud-like topping!

Step 2: Whip the mixture into fluffy perfection
- Using your stand mixer fitted with the whisk attachment (or a hand mixer with beaters), begin whipping the heavy whipping cream, Kool-Aid powder, and sugar together on medium speed for about 30–60 seconds. This gives the ingredients a chance to start combining without splashing everywhere.
- Once everything looks mostly incorporated (no large dry pockets of Kool-Aid powder), increase the speed to high.
- Continue beating on high for 2–5 minutes, depending on your mixer and the temperature of the cream. The mixture will first become thicker and start to hold soft, gentle peaks (when you lift the beaters, the tip will curl over slightly). Keep going until it reaches stiff peaks — the whipped cream will stand up straight and firm when you lift the beaters, with the peak holding its shape without flopping over. The texture should look light, glossy, and cloud-like.
Important tips:
- Stop and scrape down the sides of the bowl once or twice if you see unincorporated Kool-Aid or sugar sticking to the sides.
- Be careful not to over-whip! If you go too far, the cream can start to look grainy or even turn into butter. As soon as you see stiff peaks, stop immediately.
- The finished whipped topping should be thick enough to hold its shape when spooned, but still soft and billowy — perfect for piling high on your drink.
You now have that signature fluffy, colorful Kool-Aid whipped topping ready to go!

- Take two of your tulip-shaped glasses (the ones with the elegant, gently flared rim work especially well here). Pour your prepared Kool-Aid into each glass until it’s filled about halfway.
- Next, add ice cubes gradually until the glass is roughly two-thirds full. This usually means leaving a nice open space at the top—enough to give the drink room to chill properly, prevent overflow when stirring (if you add anything else later), and keep that classic layered look as the ice slowly melts and dilutes the Kool-Aid just right.
The ice not only chills the drink quickly but also helps stretch it a little as you sip, giving you that refreshing, not-too-sweet experience that makes Kool-Aid over ice so satisfying on a hot day.

Now this is the fun part: top each glass with a generous swirl of your Kool-Aid whipped cream.
- Spoon or pipe the whipped cream directly onto the surface of the chilled Kool-Aid and ice, letting it mound up beautifully in the center. Aim for a nice, fluffy peak that sits proud above the liquid line—think classic soda-fountain style or a little taller if you like it extra indulgent. The whipped cream should cover most of the open surface without completely burying the colorful Kool-Aid underneath, so you get that striking layered contrast as you look down into the tulip glass.
- If you’re using a piping bag, a large star tip works especially well to create those pretty ridges and swirls. If you’re spooning it on, use the back of the spoon to gently shape and lift the cream into a soft peak. Either way, don’t be shy—about 2–3 generous tablespoons per glass gives the perfect balance of creamy richness and refreshing drink.
This layer does more than just look inviting: it adds a light, airy sweetness and a smooth, velvety texture that contrasts beautifully with the cold, slightly tart Kool-Aid and the crunch of melting ice. As you sip, the whipped cream slowly blends in, making each taste a little creamier and more luxurious than the last. It’s the finishing touch that turns a simple Kool-Aid into something special and downright craveable.
- Give the drink one final, gentle stir to blend the Kool-Aid whipped cream into the chilled blue liquid below. Use a long spoon or cocktail stirrer and move in slow, sweeping circles—don’t overdo it. You’re not trying to completely dissolve the whipped cream; the goal is to create beautiful streaks and swirls of creamy white running through the vibrant blue, with some fluffy pockets still floating near the top. This partial mixing gives every sip a perfect balance: cool, tangy Kool-Aid followed by silky, sweet creaminess, with the ice keeping everything refreshingly cold as it slowly melts.
- Once you’ve got those lovely marbled layers, finish each glass with a flourish. Slide in a colorful straw—bright red, neon green, or even a striped paper one for extra fun—so it stands tall and ready to sip. For that classic summer-vibe touch, add a small paper cocktail umbrella (open it with a quick flick) perched on the rim or tucked playfully into the whipped cream peak. The little umbrella instantly turns this into a backyard party drink, a poolside treat, or just a cheerful escape on a hot afternoon.
Take that first sip and let the flavors hit: the bright, nostalgic blue raspberry (or whatever Kool-Aid flavor you chose), the smooth richness of the cream, the gentle chill from the ice, and that subtle sweetness that makes you smile. It’s simple, nostalgic, and ridiculously refreshing—the ultimate upgraded Kool-Aid experience.
There you have it: a tall, eye-catching, whipped-cream-dream of a Kool-Aid drink that’s as fun to make as it is to drink. Perfect for summer barbecues, lazy afternoons, or just treating yourself to something special. Grab a glass, kick back, and enjoy every creamy, colorful sip—summer never tasted so good!
Summer Cocktail and Beverage Recipes:
🥣 Recipe
Equipment
- 2 Tulip shaped glasses
Ingredients
For serving:
- 1 pitcher Prepared Kool Aid prepared according to package instructions
- Ice
Instructions
- Grab a large mixing bowl (a stand mixer bowl or a deep bowl suitable for electric beaters works best).
- Pour in the heavy whipping cream (make sure it’s very cold straight from the refrigerator for the best volume).
- Add one full packet of your chosen Kool-Aid powder (for the blue version, use the blue raspberry or your preferred blue-colored flavor).
- Then sprinkle in the granulated sugar — this helps sweeten the whipped cream and balances the tangy Kool-Aid flavor.
- Using your stand mixer fitted with the whisk attachment (or a hand mixer with beaters), begin whipping the heavy whipping cream, Kool-Aid powder, and sugar together on medium speed for about 30–60 seconds. This gives the ingredients a chance to start combining without splashing everywhere.
- Once everything looks mostly incorporated (no large dry pockets of Kool-Aid powder), increase the speed to high.Continue beating on high for 2–5 minutes, depending on your mixer and the temperature of the cream.
- Take two of your tulip-shaped glasses (the ones with the elegant, gently flared rim work especially well here). Pour your prepared Kool-Aid into each glass until it’s filled about halfway.
- Next, add ice cubes gradually until the glass is roughly two-thirds full. This usually means leaving a nice open space at the top—enough to give the drink room to chill properly, prevent overflow when stirring (if you add anything else later), and keep that classic layered look as the ice slowly melts and dilutes the Kool-Aid just right.
- Spoon or pipe the whipped cream directly onto the surface of the chilled Kool-Aid and ice, letting it mound up beautifully in the center. Aim for a nice, fluffy peak that sits proud above the liquid line—think classic soda-fountain style or a little taller if you like it extra indulgent. The whipped cream should cover most of the open surface without completely burying the colorful Kool-Aid underneath, so you get that striking layered contrast as you look down into the tulip glass.
- If you’re using a piping bag, a large star tip works especially well to create those pretty ridges and swirls. If you’re spooning it on, use the back of the spoon to gently shape and lift the cream into a soft peak. Either way, don’t be shy—about 2–3 generous tablespoons per glass gives the perfect balance of creamy richness and refreshing drink.
- Give the drink one final, gentle stir to blend the Kool-Aid whipped cream into the chilled blue liquid below. Use a long spoon or cocktail stirrer and move in slow, sweeping circles—don’t overdo it. You’re not trying to completely dissolve the whipped cream; the goal is to create beautiful streaks and swirls of creamy white running through the vibrant blue, with some fluffy pockets still floating near the top. This partial mixing gives every sip a perfect balance: cool, tangy Kool-Aid followed by silky, sweet creaminess, with the ice keeping everything refreshingly cold as it slowly melts.
- Once you’ve got those lovely marbled layers, finish each glass with a flourish. Slide in a colorful straw—bright red, neon green, or even a striped paper one for extra fun—so it stands tall and ready to sip. For that classic summer-vibe touch, add a small paper cocktail umbrella (open it with a quick flick) perched on the rim or tucked playfully into the whipped cream peak. The little umbrella instantly turns this into a backyard party drink, a poolside treat, or just a cheerful escape on a hot afternoon.
Nutrition
Click HERE to save this whipped kool aid recipe to Pinterest