DIY Christmas Wine Cork Wreath
Looking for perfect cork crafts or wine cork ideas for a DIY Christmas project? We’ve crafted this beautiful DIY Christmas wine cork wreath with recycled wine corks. And you too can turn your saved wine corks into a festive Christmas wreath with these simple steps on how to make a cork wreath.

Got a stash of wine corks you’ve been saving “for something special”? This stunning DIY Christmas Wine Cork Wreath is the project you’ve been waiting for! Turn those recycled treasures into a rustic, festive holiday wreath that’s bursting with texture—complete with lush greenery sprigs and bright cranberry accents. It’s surprisingly easy (just hot glue and layers!), totally customizable with your favorite corks, and guaranteed to become your new favorite Christmas decoration. Cheers to upcycling in style!
This post contains affiliate links which means if you make a purchase we might receive a small commission at no additional cost to you.

Well we have recently made this is gorgeous wine cork wreath using these recycled wine corks. We have been saving wine corks like this for years and the collection has grown and grown. Well, the great project has finally arrived, this Christmas Wine Cork Wreath is exactly what all those corks have been waiting on. But whether you have been saving wine corks or not, this project will be a great addition to your holiday decorating and wine corks can always be purchased.
If you would also like to use your wine corks in this wine cork craft, then you are in the right place to learn to make this stunning craft. It not only serves as a fun activity, but also as a great addition to your holiday decorations. So why wait? Start right here in crafting your own wine cork wreath for a more personalized holiday décor.
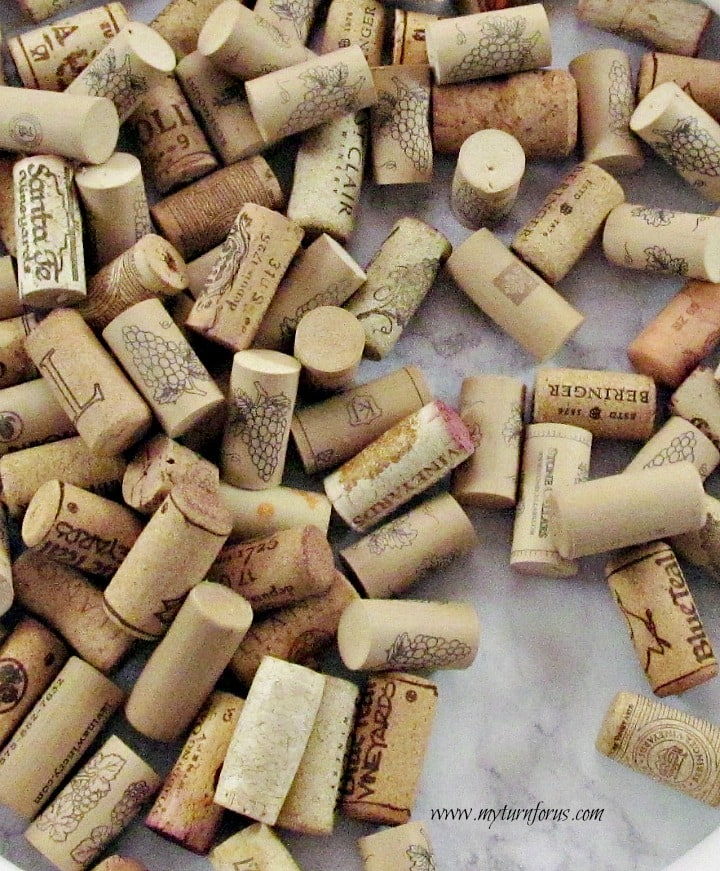
We have a wine cork collector/holder on the bar, and it has filled up several times over the years and I haven’t had the heart to throw them away. I would dump them in a collection box in my craft room awaiting some great project. Do you also save wine corks but not sure exactly what you wish to do with them?
Box of old wine corks? Check. Crafty hands? Check. A love for Holiday decor? Check. It’s time to put your wine corks collection into good use. You’re just a short DIY project away from sparkling up your holiday with this DIY Christmas Wine Cork Wreath. Enjoy the fun and excitement of crafting your own holiday decor. We promise, it’s easier than you think and it’s sure to become a favorite piece with your holiday decorations.
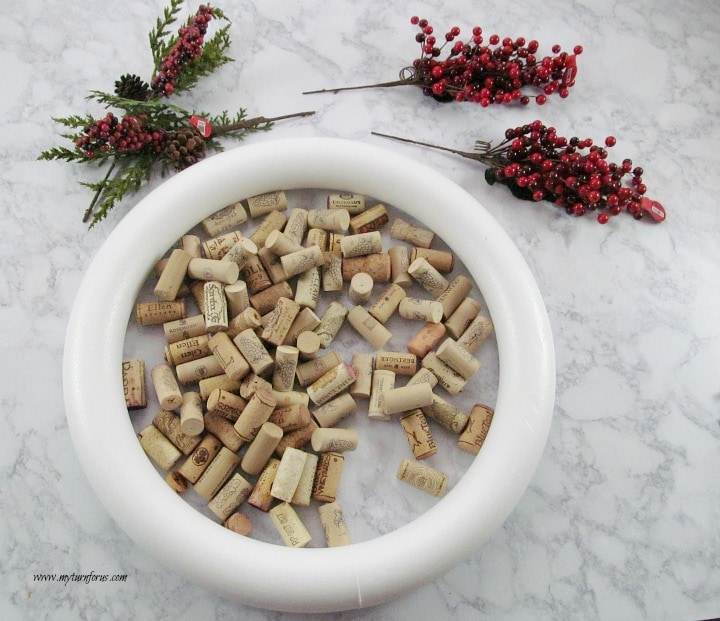
Wine Cork Wreath Materials Needed:
Supplies:
- Styrofoam wreath(size depends on the number of corks you have)
- Assorted Wine Corks
- Christmas Floral Greenery
- Cranberries
Equipment Needed:
Here are 3 pro tips for this Wine Cork Wreath
- Sort your corks first – Group them by size, color, and type (natural vs. synthetic). Having similar-sized corks for each row makes layering much easier and gives the wreath a polished, professional look instead of a random jumble. Bonus: Save your prettiest or most memorable corks for the outermost ring—they’re the ones everyone will see!
- Work in concentric circles and glue in stages – Start from the inner ring and work your way out. Glue 5–8 corks at a time, press firmly for 10–15 seconds, then let that section set before moving on. This prevents the hot glue from cooling too fast and keeps already-placed corks from popping off when you’re wrestling with the next ones.
- Use a high-temp hot glue gun and have extra glue sticks ready – Low-temp glue often fails with heavier corks and the wreath can fall apart. High-temp bonds instantly and holds forever. You’ll use way more glue than you expect (usually 30–50 sticks for a 14–16 inch wreath), so stock up before you start!
Follow these and your wreath will be sturdy, gorgeous, and ready to hang for many Christmases to come. Happy crafting!
How to make a Cork Wreath:
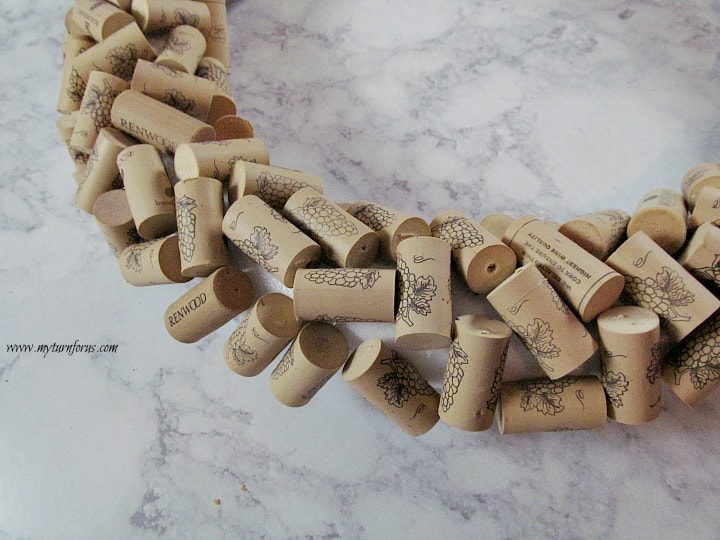
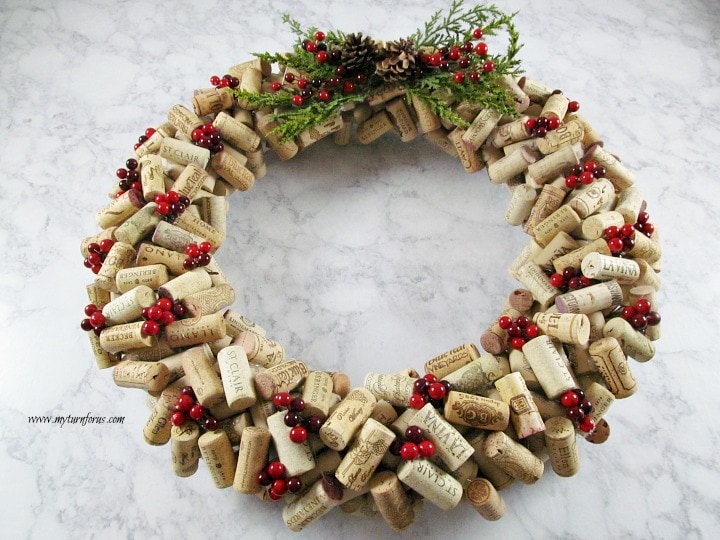
- We had plenty of plain or less-attractive corks in our collection, so we used those for the bottom layer (since the wreath needs at least two layers and the base ones won’t be as visible). Set aside your prettiest, most interesting, or sentimental corks—these will go on the top layer where they’ll really shine!
- Start with the plainer corks: Apply a generous bead of high-temp hot glue to the flat side of each cork and press it firmly onto the foam wreath form. Arrange them randomly, overlapping as needed to cover every bit of the foam base—no need for perfect alignment; the casual, haphazard look is part of the charm!
- Once the entire foam base is covered with your first layer of corks, it’s time for the fun part—adding the second (top) layer!
- Grab those prettier, more interesting, or sentimental corks you set aside earlier (the ones from your favorite wineries always look amazing here). Apply a generous amount of high-temp hot glue to the bottom or side of each cork and place them randomly over the first layer, overlapping and staggering them to hide any gaps and create that full, textured look. Keep the arrangement nice and haphazard—it’s supposed to feel organic and rustic, not perfectly uniform!
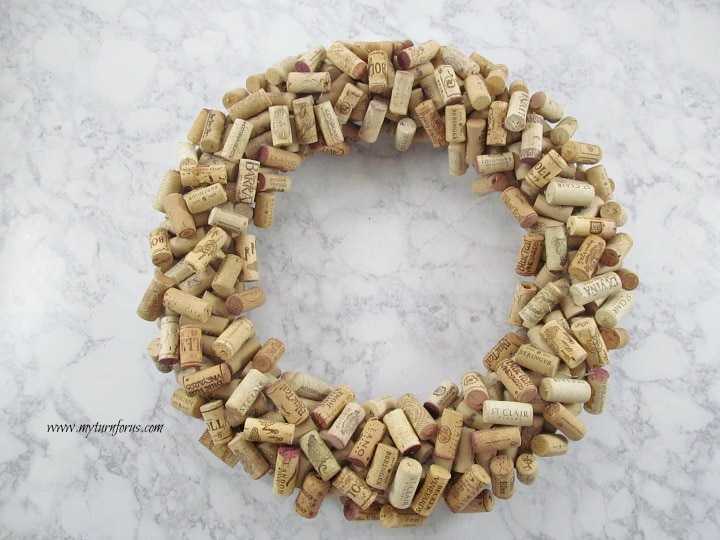
- Keep building until the wreath looks lush and no foam (or first-layer gaps) are showing.

- If your faux greenery pick doesn’t already come in the perfect clusters, no problem—just snip the sprigs apart with wire cutters or strong scissors. Then you can rearrange and glue them exactly how you like.
- We rebuilt ours into fuller, more balanced bunches and tucked in some of the same bright red cranberries we planned to scatter around the finished wreath. This little trick ties everything together and gives the whole piece a fresh, just-picked-from-the-woods look!
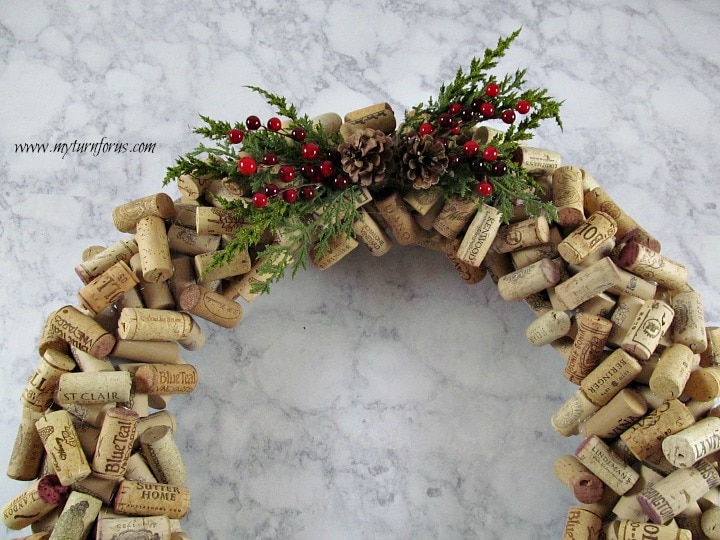
- Once your greenery bunches (with cranberries tucked in) are ready, decide where you want that lush pop of holiday color—most people love it at the top for a classic look, but the bottom or sides work beautifully too for something a little different.
- Add a generous amount of high-temp hot glue to the stems/back of the arrangement and press it firmly onto the corks in your chosen spot. Hold for 15–20 seconds until secure. That’s it—your wine cork wreath now has the perfect festive finishing touch!
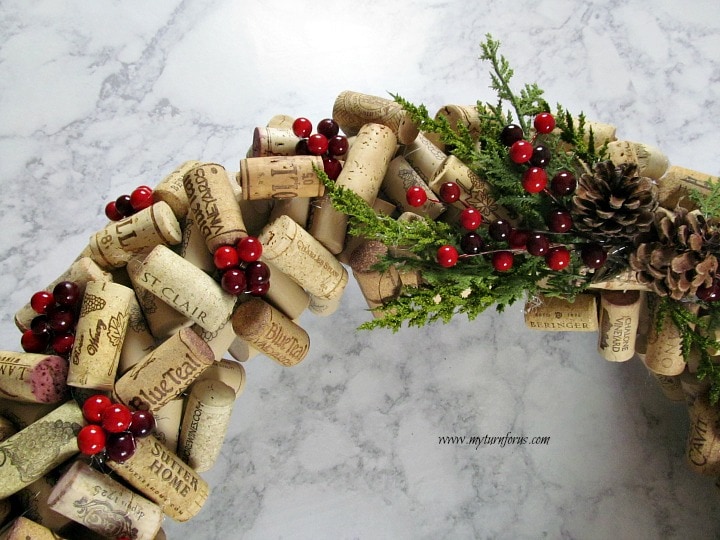
- To finish off your wreath with those festive pops of red, take your cranberry sprays and cut them into smaller, manageable bunches (about 3–5 inches long works perfectly).
- Feel free to mix and match pieces or glue a few stems together to create fuller clusters if needed. Then arrange the cranberry bunches around the wreath wherever you like—tucked between corks for a natural look—and secure each one with a good dab of high-temp hot glue. Press firmly for a few seconds until set.
- Finally, flip the wreath over and hot-glue a sturdy metal wreath hanger (or a loop of floral wire) to the back so it’s ready to hang!
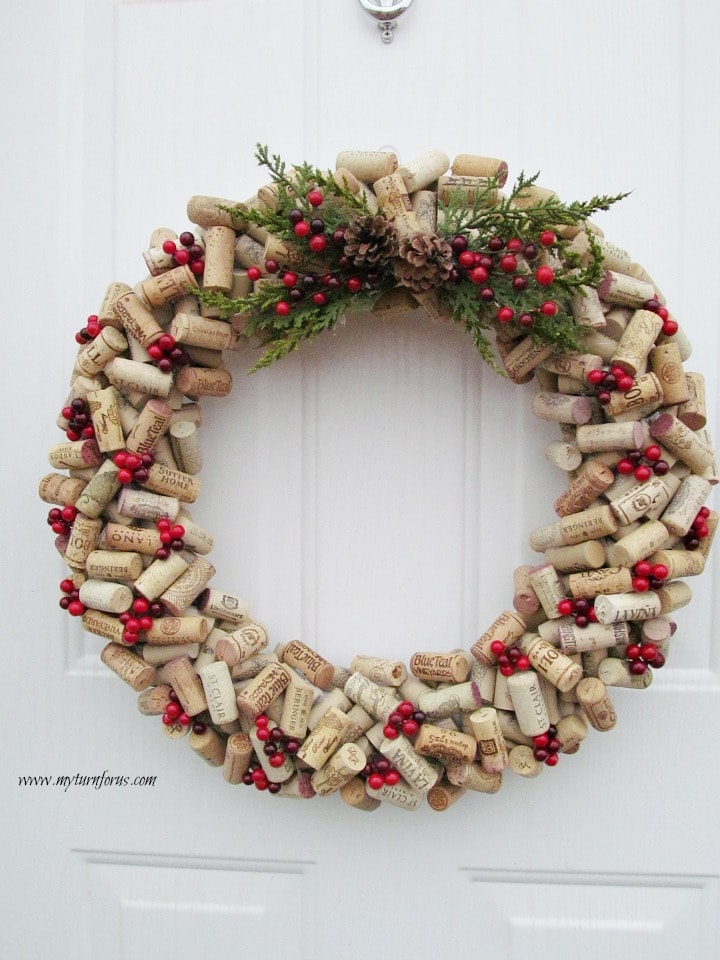
- This beauty looks amazing on a front door (protected from rain, of course), in an entryway, above the fireplace, or anywhere you want a little rustic holiday charm.
- Quick note: Since it’s made with real corks and hot glue, keep this wreath indoors or under a covered porch. Rain and moisture are definitely not invited to the party!
This DIY Wine Cork Wreath is the ultimate “sip and craft” triumph—turning years of happy-hour memories into a gorgeous, one-of-a-kind Christmas decoration you’ll proudly hang year after year. It’s rustic, festive, eco-friendly, and always a conversation starter (“Yes, we really drank all that wine!”).
Grab your glue gun, pour yourself a glass (for inspiration, of course), and get ready for the most satisfying holiday project ever. Cheers to your beautiful new wreath!
✂️ Tutorial
Equipment
Ingredients
- Styrofoam wreath size depends on the number of corks you have
- Assorted Wine Corks
- Christmas Floral Greenery
- Cranberries Floral
- Hot glue gun
Instructions
- We had plenty of plain or less-attractive corks in our collection, so we used those for the bottom layer (since the wreath needs at least two layers and the base ones won’t be as visible). Set aside your prettiest, most interesting, or sentimental corks—these will go on the top layer where they’ll really shine!
- Start with the plainer corks: Apply a generous bead of high-temp hot glue to the flat side of each cork and press it firmly onto the foam wreath form. Arrange them randomly, overlapping as needed to cover every bit of the foam base—no need for perfect alignment; the casual, haphazard look is part of the charm!
- Once the entire foam base is covered with your first layer of corks, it’s time for the fun part—adding the second (top) layer!
- Grab those prettier, more interesting, or sentimental corks you set aside earlier (the ones from your favorite wineries always look amazing here). Apply a generous amount of high-temp hot glue to the bottom or side of each cork and place them randomly over the first layer, overlapping and staggering them to hide any gaps and create that full, textured look. Keep the arrangement nice and haphazard—it’s supposed to feel organic and rustic, not perfectly uniform.
- Keep building until the wreath looks lush and no foam (or first-layer gaps) are showing.
- If your faux greenery pick doesn’t already come in the perfect clusters, no problem—just snip the sprigs apart with wire cutters or strong scissors. Then you can rearrange and glue them exactly how you like.
- We rebuilt ours into fuller, more balanced bunches and tucked in some of the same bright red cranberries we planned to scatter around the finished wreath. This little trick ties everything together and gives the whole piece a fresh, just-picked-from-the-woods look!
- Once your greenery bunches (with cranberries tucked in) are ready, decide where you want that lush pop of holiday color—most people love it at the top for a classic look, but the bottom or sides work beautifully too for something a little different
- .Add a generous amount of high-temp hot glue to the stems/back of the arrangement and press it firmly onto the corks in your chosen spot. Hold for 15–20 seconds until secure. That’s it—your wine cork wreath now has the perfect festive finishing touch!
- To finish off your wreath with those festive pops of red, take your cranberry sprays and cut them into smaller, manageable bunches (about 3–5 inches long works perfectly)
- .Feel free to mix and match pieces or glue a few stems together to create fuller clusters if needed. Then arrange the cranberry bunches around the wreath wherever you like—tucked between corks for a natural look—and secure each one with a good dab of high-temp hot glue. Press firmly for a few seconds until set.
- Finally, flip the wreath over and hot-glue a sturdy metal wreath hanger (or a loop of floral wire) to the back so it’s ready to hang!
- This beauty looks amazing on a front door (protected from rain, of course), in an entryway, above the fireplace, or anywhere you want a little rustic holiday charm.Quick note: Since it’s made with real corks and hot glue, keep this wreath indoors or under a covered porch. Rain and moisture are definitely not invited to the party!


I just love this project. I've always wanted to make one but never had the time. I do have yeaaarrrrs worth of corks so I might just give this a go for next year. It's beautiful! Pinning/sharing.
Do you have a recommendation for what kind of hook to use on the back to hang it?
Great question. Thanks for asking and reminding me that I do need to share how we hang it. I had to go look at it again to remember but we used picture hanging wire hot glued to the back. I will update the post and share pictures asap.
@Evelyn, Hi can u show pics of the hanging please
Oh excellent idea. Let me go pull it out. (haven’t completed decorating yet)
I love this! Did you glue corks on the back of the wreath too?
Thanks so much. No, we only glued them on the sides and front and placed them so it would hang flat against the door.
Awesome! My husband recommended the same thing. I finished mine yesterday and love how it looks! Thanks for the inspiration!
That is so great and thanks so much for letting us know. Merry Christmas!
Everytime I glue a cork on my wreath it doesn’t stay. I use a generous amount of glue bit still will not stick. What am I doing wrong? I am using a straw wreath.
I think it’s the straw. We used a solid styrofoam wreath. I’m so sorry you are having trouble, maybe replace the wreath with styrofoam.
Hi Evelyn, What size is your wreath? How many corks did you use on this? I have about 200 corks to work with. Wondering if I can replicate your look or if I want to use these for another project. Your cork wreath is the best I’ve seen. ? Thank you!
You are right a great idea would have been to count cork but I unfortunately didn’t. Bummer. I can’t remember how big it is but as soon as I get home I’ll measure it because I’ve forgotten.
@Caroline, did you do this project and have a size suggestion???
@Evelyn, did you do a count and measure?? Looking to replicate, it’s beautiful, thanks!
Unfortunately I did not count the corks, looking back I should have. (maybe I need to attempt counting them when I decorate for Christmas this year?, I’ll let you know 😏) And I know you could replicate it no mater what size wreath form you use. It’s really easy and fun. Hugs my friend
Do you have an email?
Yes I do, evelyn@myturnforus.
After time, have you had an issue with the hot glue holding the corks together? I’ve done cork and hot glue projects before and the glue doesn’t seem to hold together? Is there a certain brand of hot glue you use?
I used just any hot glue. But sometimes when I pull it out for the season and it hasn’t been stored property (other items on top of it) some of the corks have come off. But not that many and it only takes me a couple minutes to repair. But I have had it for over 3 years and no issues.