Peanut Butter Spider Cookies
Halloween baking doesn’t get any better than this! Our Halloween chocolate peanut butter spider cookies are a fun, tasty way to celebrate the spooky season. These spider peanut butter blossoms cookies are decorated with miniature Reese’s cups. Bite into a fusion of chocolate and peanut butter while enjoying the festive spirit. And these cookies make the cutest Halloween spider snacks you’ll ever eat.

Halloween is such a fun holiday where we love to dress up in costumes and eat sweet treats. And it’s loads of fun to make spooky but tasty treats for parties, or just for the family, like these peanut butter spider cookies. An exciting recipe for Halloween Chocolate Peanut Butter Spider Cookies. These cookies, uniquely designed into spooky spider shapes and made with Reeses cups, are perfect for your Halloween celebrations. Combining rich peanut butter and chocolate flavors, these festive spider cookies are sure to crawl into the hearts of your little ghosts and goblins!
This post contains affiliate links which means if you make a purchase we might receive a small commission at no additional cost to you.

We use our easy peanut butter blossoms cookie recipe and make these cute spider snacks. These spider peanut butter cookies are made with a mini Reese’s peanut butter cup for the body and candy googly eyes. Your little ghosts, goblin, princess’ and super heroes will certainly gobble up these Halloween treats.
Peanut Butter Spider Cookie Recipe:

Ingredients:
- 1 ½ cups flour
- 1 teaspoon baking soda
- ½ teaspoon baking powder
- ½ cup sugar
- ½ cup brown sugar
- ½ cup creamy peanut butter
- ½ cup butter, softened
- 1 egg
- 1 teaspoon vanilla extract
- 36 Mini Reese’s peanut butter cups
Ingredients for decorating:
- ½ cup sugar
- ¼ cup chocolate chips, melted
- Candy Edible Googly Eyes
Equipment Needed:
- Baking Sheet
- Parchment Paper
- Mixing Bowls
- Wilton Disposable piping bag
🥣 Recipe Tips
- Chill the Dough for Easier Handling: If the peanut butter cookie dough feels too sticky or soft after mixing, refrigerate it for 30 minutes as suggested in the recipe. This firms up the dough, making it easier to roll into even balls and preventing the cookies from spreading too much during baking. For best results, cover the dough to avoid drying out in the fridge.
- Press Reese’s Cups Gently and Quickly: When adding the mini Reese’s peanut butter cups to the cookies right after baking, press them in gently but firmly while the cookies are still soft and warm. Work quickly to ensure the cookies hold their shape and the chocolate cups adhere properly without melting excessively. If the cookies cool too much, the cups won’t stick as well.
- Use a Small Piping Tip for Precise Spider Legs: When piping the chocolate legs and attaching the candy googly eyes, use a small round piping tip (or cut a tiny hole in the piping bag) for better control. This helps create thin, neat spider legs and ensures the melted chocolate doesn’t overwhelm the cookie. Test the chocolate consistency on a piece of parchment paper first to avoid runny or clumpy lines.
How to make these Chocolate Peanut Butter Spider Cookies:

Preheat your oven to 375° F and line a baking sheet with parchment paper. Start your peanut butter spider cookies by making the dough. Add the flour, baking soda, and baking powder to a medium bowl. Whisk to combine all the dry ingredients together, then set your bowl aside.

In a separate large bowl, add the softened butter, peanut butter, sugar, and brown sugar. Beat the ingredients together until the mixture is smooth and creamy.

Add the egg and the vanilla extract and beat to combine all the ingredients. The mixture will be light and fluffy.

Add the flour mixture to the bowl with the peanut butter mixture. Beat the ingredients together on low until the dough begins to come together. If the dough seems too sticky , you can chill it for 30 minutes.

Place 1/3 cup sugar in a small bowl. Use a tablespoon or cookie scoop to scoop the dough and roll the dough between your hands to form an even ball. Then roll each ball in the sugar until it’s fully coated on all sides. Continue making cookie balls until all the dough has been used.

Place each cookie ball on the parchment lined baking sheet. Lightly press the cookies down with your hand to flatten them. Bake the cookies for 8 to 10 minutes, until the bottom of the cookies is golden brown but the tops are still slightly soft.

Immediately after removing the cookies from the oven, press a chocolate peanut butter cup upside down into the top of each cookie. This will be the cute little spider’s body in the cookies.
Allow the cookies to cool for five minutes on the baking sheet, then transfer the cookies to a wire cooling rack to cool completely.

When the cookies are cooled, place the chocolate chips in your Wilton piping bag. (You can use other piping bags but make sure your piping bags are microwave safe.). Microwave at 50% power or defrost setting for 1 minute and knead bag. Return to the microwave, kneading at 30-second intervals until chocolate is melted.
Let your melted chocolate stay in the microwave for 30 to 60 seconds before removing. This lets the residual heat from the bag melt any remaining chocolate. Remove bag from microwave and kneed.
Pipe eight legs on the sides of each peanut butter cup to make the peanut butter spider cookies. Also use the melted chocolate to attach two candy googly eyes to the top of each peanut butter cup to complete your spider snack cookie.
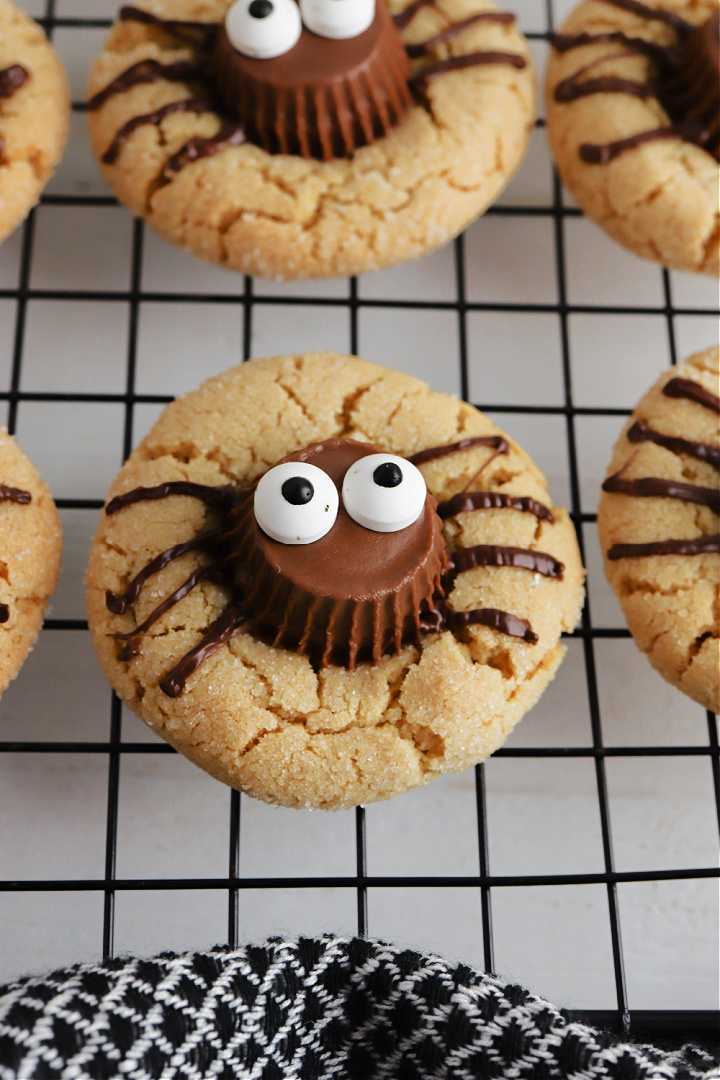
Allow the melted chocolate to cool and harden before serving your peanut butter spider cookies. These Peanut Butter Spider Cookies from will crawl their way into your heart and stomach this Halloween.
Now get ready for a spooktacular treat with the Peanut Butter Spider Cookies recipe. This fun Halloween baking project transforms classic peanut butter blossom cookies into adorable spider snacks using mini Reese’s peanut butter cups for the body, candy googly eyes, and melted chocolate for legs.
Did you know? Our Halloween Spider Peanut Butter Cookies are not only spooky but also delicious! 🎃Rich in protein and fun, these treats are perfect for your little ghosts, goblins, princesses, and superheroes. Pro tip: The secret is in the mini Reese’s cups and candy googly eyes. Ready to have a spooktacular Halloween?
Other Halloween Treats:
🥣 Recipe
Ingredients
- 1 ½ cups flour
- 1 teaspoon baking soda
- ½ teaspoon baking powder
- ½ cup sugar
- ½ cup brown sugar
- ½ cup creamy peanut butter
- ½ cup butter softened
- 1 egg
- 1 teaspoon vanilla extract
- 36 Mini Reese’s peanut butter cups
Ingredients for decorating
- ⅓ cup sugar
- ¼ cup chocolate chips melted
- 72 Candy Edible Googly Eyes
Instructions
- Preheat your oven to 375° F and line a baking sheet with parchment paper.
- Start your peanut butter spider cookies by making the dough. Add the flour, baking soda, and baking powder to a medium bowl. Whisk to combine all the dry ingredients together, then set your bowl aside.
- In a separate large bowl, add the softened butter, peanut butter, sugar, and brown sugar. Beat the ingredients together until the mixture is smooth and creamy.
- Add the egg and the vanilla extract and beat to combine all the ingredients. The mixture will be light and fluffy.
- Add the flour mixture to the bowl with the peanut butter mixture. Beat the ingredients together on low until the dough begins to come together. If the dough seems too sticky , you can chill it for 30 minutes.
- Place 1/3 cup sugar in a small bowl. Use a tablespoon or cookie scoop to scoop the dough and roll the dough between your hands to form an even ball. Then roll each ball in the sugar until it’s fully coated on all sides. Continue making cookie balls until all the dough has been used
- Place each cookie ball on the parchment lined baking sheet. Lightly press the cookies down with your hand to flatten them. Bake the cookies for 8 to 10 minutes, until the bottom of the cookies is golden brown but the tops are still slightly soft.
- Immediately after removing the cookies from the oven, press a chocolate peanut butter cup upside down into the top of each cookie. This will be the cute little spider’s body in the cookies.
- Allow the cookies to cool for five minutes on the baking sheet, then transfer the cookies to a wire cooling rack to cool completely.
- When the cookies are cooled, place the chocolate chips in your Wilton piping bag. (You can use other piping bags but make sure your piping bags are microwave safe.). Microwave at 50% power or defrost setting for 1 minute and knead bag. Return to the microwave, kneading at 30-second intervals until chocolate is melted.
- Let your melted chocolate stay in the microwave for 30 to 60 seconds before removing. This lets the residual heat from the bag melt any remaining chocolate. Remove bag from microwave and kneed.
- Pipe eight legs on the sides of each peanut butter cup to make the peanut butter spider cookies. Also use the melted chocolate to attach two googly eyes to the top of each peanut butter cup to complete your spider snack cookie.
- Allow the melted chocolate to cool and harden before serving your peanut butter spider cookies.
Nutrition
Click HERE to save these Chocolate Peanut Butter Spider Cookies to Pinterest