How to Roast Garlic for Roasted Garlic Paste
Discover the magic of roasted garlic paste with this simple guide. Learn how to roast a single bulb of garlic to create a sweet, caramelized paste that elevates dishes from pasta to steaks. Plus, get expert tips on storing it to keep this game-changing flavor on hand. Transform your cooking with this easy, aromatic recipe!

Do you want a simple trick that can revolutionize your dishes? Of course you do, we all do! We love simple and easy but with the most bang. Well I have it for you today!
This guide will teach you how to roast a bulb of garlic to create a lusciously flavorful paste that can add a distinctive and aromatic kick to your dishes. Beyond that, learn how to properly store your roasted garlic paste so that you always have it on hand and ready to enhance your cooking. By understanding these simple techniques, you’ll be able to revolutionize your recipes and discover a taste that you won’t be able to live without. The sky is the limit with these precious globs of goodness!
This post contains affiliate links which means if you make a purchase we might receive a small commission at no additional cost to you.

It’s so easy to do and the possibilities are endless and if you know how to store roasted garlic you can always have this on hand. Smear roasted garlic paste on bread, add to soups, to mashed potatoes, to veggie dishes, to pasta dishes, spread it on a pizza crust or even on a nice steak.
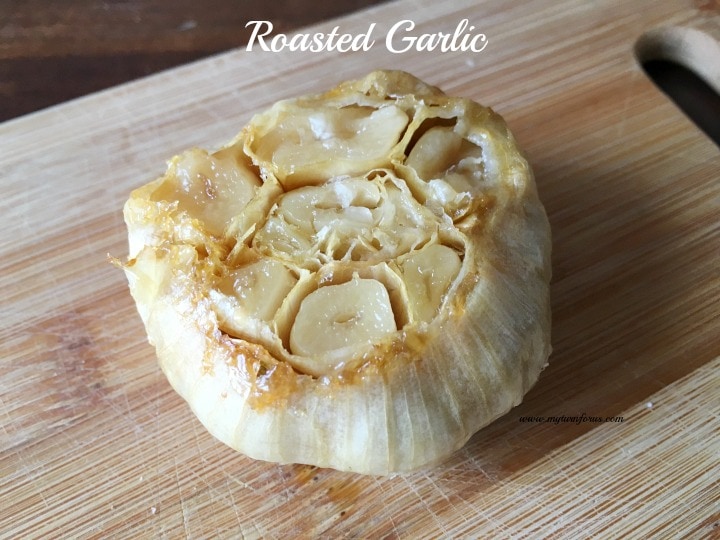
How to roast a bulb garlic should have been one of the first lessons I learned when I started cooking. It’s such an easy way to add that awesome aromatic flavor to so many dishes. Roasting garlic transforms garlic from raw and crunchy to this delectable soft caramelized almost sweet flavor. I swear roasted garlic paste is almost like magic and it adds the most delicious mouthwatering aroma to your home.
Roasted Garlic Recipe:

Ingredients:
- 2–3 whole heads of garlic (fresh, firm bulbs work best)
- 1–2 tablespoons olive oil (or melted butter for extra richness)
- Optional: Pinch of kosher salt, fresh thyme/rosemary sprigs, or red chili flakes for added flavor
Equipment Needed:
- Aluminum Foil
- Sharp Knife
🥣 Recipe Tips
- Choose Fresh Garlic for Best Flavor: Opt for firm, plump garlic bulbs with tight, unbroken skins. Fresh garlic yields a sweeter, more robust caramelized flavor compared to older bulbs, which can sometimes taste bitter when roasted.
- Adjust Roasting Time for Clove Size: Larger garlic cloves may need slightly longer in the oven to achieve that soft, spreadable texture. Check for doneness every 5-10 minutes after the initial 30 minutes to avoid overcooking, which can lead to a dry paste.
- Enhance with Herbs for Extra Depth: Before sealing the foil, sprinkle a pinch of dried thyme or rosemary over the garlic along with the olive oil. This adds a subtle, aromatic layer to your roasted garlic paste, perfect for elevating dishes like soups or spreads.
How to Roast Garlic
So grab a couple of garlic bulbs, you can do one but I always do at least two. Because if you don’t, you will wish you did because you can’t have too much roasted garlic. This is a great way to use those garlic bulbs that have been in the pantry for a while but fresh ones are even better. Either way you will not be disappointed.

- With a sharp paring knife, slice off the top ¼–½ inch of each garlic bulb to expose the cloves (no need to peel the outer papery skin).

- Place the bulbs cut-side up in a square piece of foil large enough to completely wrap up the garlic bulb. Drizzle each with about ½ tablespoon olive oil, ensuring it seeps into the cloves. Sprinkle with salt and any optional herbs or flakes. Twist and close foil to seal completely.
- Place in a 400 degree preheated oven and bake for 30 minutes, check for doneness, the cloves should feel soft when pressed
- Continue cooking and checking ever 10 minutes until it’s soft. Remove from oven and allow to cool, open foil carefully saving any oils.
- Gently squeeze out each garlic clove and smash with a fork
- Place in a small dish and add the saved oil from the foil packets. Blend well. You could also add just a pinch of salt.
With just a few simple steps, you’ve unlocked the secret to roasted garlic paste—a versatile, flavor-packed condiment that will elevate your cooking to new heights. Whether you’re spreading it on warm bread, stirring it into soups, or adding it to your favorite dishes, this caramelized goodness is sure to become a kitchen staple. Plus, with easy storage options, you’ll always have this culinary gem ready to transform your meals. So, fire up that oven, roast some garlic, and let your dishes shine with unforgettable flavor!
Roasted garlic paste:

Gently squeeze out each garlic clove and smash with a fork. Place in a small dish and add the saved oil from the foil packets. Blend well. You could also add just a pinch of salt.
How to Roast Garlic Using a Clay Garlic Roaster:
A clay (or terra-cotta) garlic roaster is a lidded pot designed specifically for roasting whole garlic bulbs, creating a steamy, even environment that results in soft, caramelized cloves with a sweet, buttery flavor. It’s reusable, eco-friendly, and prevents overcooking compared to foil methods. These roasters typically hold 2–4 bulbs and require soaking to avoid cracking from thermal shock. Here’s a simple, foolproof guide based on reliable techniques.
Ingredients:
- 2–3 whole heads of garlic (fresh, firm bulbs work best)
- 1–2 tablespoons olive oil (or melted butter for extra richness)
- Optional: Pinch of kosher salt, fresh thyme/rosemary sprigs, or red chili flakes for added flavor
Equipment:
- Clay garlic roaster (base and lid)
- Sharp knife
- Baking sheet (optional, for stability)
Instructions to Roast Garlic using a Clay Roaster
- Prepare the roaster: Fill a sink or large bowl with water and submerge both the base and lid of the clay roaster for 15–30 minutes. This soaks the porous clay, creating steam during roasting and preventing cracks. Drain and pat dry.
- Prep the garlic: Place the roaster on a stable surface. Slice off the top ¼–½ inch of each garlic bulb to expose the cloves (no need to peel the outer papery skin). Place the bulbs cut-side up in the roaster base. Drizzle each with about ½ tablespoon olive oil, ensuring it seeps into the cloves. Sprinkle with salt and any optional herbs or flakes.
- Assemble and roast: Fit the lid snugly on the base. For best results, place the roaster on a baking sheet and into a cold oven (do not preheat—this gradual heating protects the clay). Set the oven to 350°F (175°C). Roast for 45–90 minutes, depending on bulb size and desired caramelization:
- Check at 45 minutes by gently squeezing a bulb through the lid (or peek inside)—cloves should be soft and golden, like squeezable toothpaste.
- Larger bulbs may need up to 90 minutes; smaller ones could be ready sooner.
- If using a preheated oven (riskier for clay), reduce time to 30–45 minutes and monitor closely.
How to store roasted garlic:
To keep your roasted garlic paste fresh and ready for use, follow these simple storage methods.
Refrigerator Storage (Short-Term):
- Place the roasted garlic paste in a small, leakproof airtight container.
- Cover the paste completely with olive oil to preserve freshness and prevent air exposure.
- Store in the refrigerator for up to 2 weeks. Stir before using, as the oil may separate.
Freezer Storage (Long-Term):
- Spoon the paste into ice cube trays or freezer-safe silicone pods (1 tablespoon per slot works well for portion control).
- Cover with a thin layer of olive oil (optional for extra protection).
- Freeze until solid, then transfer the cubes to a freezer-safe bag or container.
- Store in the freezer for up to 3 months. Thaw individual cubes in the fridge or at room temperature when ready to use.
These methods ensure your roasted garlic paste stays flavorful and ready to elevate your dishes anytime!
Imagine the intoxicating aroma filling your kitchen, and the sweet, caramelized flavor it will add to your dishes. It’s easy, it’s delicious, and it’s a total game-changer! Are you ready to revolutionize your cooking?
How to Use Roasted Garlic:
Roasted garlic is a versatile ingredient that adds a sweet, caramelized, and mellow flavor to a wide range of dishes. Unlike raw garlic, its softer texture and less pungent taste make it perfect for spreading, mixing, or incorporating into recipes. Here are several ways to use roasted garlic.
1. Spreads and Dips:
- Garlic Bread: Mash roasted garlic cloves or paste with softened butter, a pinch of salt, and optional herbs like parsley or thyme. Spread on crusty bread and toast until golden for an irresistible appetizer.
- Hummus or Dips: Blend roasted garlic into hummus, guacamole, or yogurt-based dips for a rich, savory depth. It pairs especially well with creamy textures.
- Sandwich Spread: Smear roasted garlic paste directly onto sandwiches or wraps, especially with meats, cheeses, or grilled vegetables, for a gourmet touch.
2. Soups and Sauces:
- Soups: Stir roasted garlic paste into creamy soups like potato, butternut squash, or tomato for a warm, aromatic boost. Add it near the end of cooking to preserve its flavor.
- Pasta Sauces: Mix into Alfredo, marinara, or pesto sauces to enhance richness. A tablespoon of roasted garlic paste can transform a simple olive oil and pasta dish.
- Gravy or Broth: Blend into gravies or broths for roasts or stews to add a subtle, sweet undertone.
3. Side Dishes:
- Mashed Potatoes: Fold roasted garlic paste into mashed potatoes for a creamy, flavorful side that pairs well with meats or vegetables. Start with 1–2 tablespoons per pound of potatoes.
- Roasted Vegetables: Toss roasted garlic cloves or paste with vegetables like carrots, zucchini, or asparagus before roasting to infuse them with a sweet, garlicky flavor.
- Rice or Grains: Stir into cooked rice, quinoa, or farro for an aromatic twist that elevates simple grain dishes.
4. Main Dishes:
- Pizza Topping: Spread roasted garlic paste on pizza dough as a base before adding sauce, cheese, or toppings for a gourmet pizza experience.
- Steak or Protein Rub: Rub roasted garlic paste onto steaks, chicken, or pork before grilling or searing for a caramelized, savory crust.
- Seafood: Mix into marinades for shrimp or fish, or blend with butter to create a sauce for scallops or lobster.
5. Condiments and Dressings:
- Vinaigrettes: Whisk roasted garlic paste into salad dressings or vinaigrettes for a smooth, umami-rich flavor that complements greens or grain salads.
- Aioli or Mayo: Blend into homemade mayonnaise or aioli for a garlicky spread that’s perfect for burgers, fries, or veggie platters.
- Compound Butter: Combine with softened butter, herbs, and a touch of lemon zest for a versatile condiment to top grilled meats or vegetables.
Tips for Using Roasted Garlic
- Start Small: Roasted garlic is milder than raw, but its flavor is concentrated. Begin with 1–2 teaspoons of paste (or 1–2 cloves) per serving and adjust to taste.
- Storage for Convenience: Use the storage methods from the recipe—store paste in olive oil in the fridge for up to 2 weeks or freeze in 1-tablespoon portions for up to 3 months. Frozen cubes can be tossed directly into hot dishes.
- Texture Options: Use whole roasted cloves for a rustic look in dishes like salads or charcuterie boards, or mash into a smooth paste for seamless blending into sauces or spreads.
- Experiment Freely: Its mild, sweet profile makes roasted garlic versatile—try it in unexpected places like scrambled eggs, risotto, or even baked goods like savory scones.
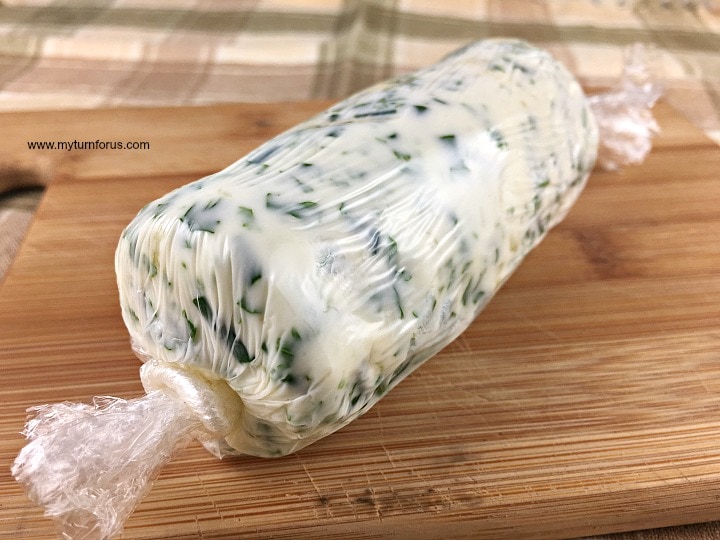
Recipe Idea: Roasted Garlic Butter
- Squeeze out the cloves from 1–2 roasted garlic bulbs.
- Mash with ½ cup softened unsalted butter, a pinch of salt, and 1 teaspoon chopped fresh parsley.
- Roll into a log using plastic wrap and chill. Slice to serve on steak, bread, or vegetables.
Roasted garlic’s sweet, nutty flavor can elevate almost any dish, making it a kitchen staple. Whether you’re spreading it on bread or stirring it into a sauce, it’s an easy way to impress with minimal effort.
Now wasn’t that trick simple? And can you think of ways it will revolutionize your dishes? Go for it, the sky’s the limit on how you can enjoy these precious globs of goodness! You will soon learn that this is one flavor that you can not live without.
🥣 Recipe
Equipment
- foil square
- Clay Garlic Roaster Optional
Ingredients
- Whole Garlic Bulbs
- Olive Oil
- Pinch of kosher salt, fresh thyme/rosemary sprigs, or red chili flakes for added flavor Optional
Instructions
- Slice off the top ¼–½ inch of each garlic bulb to expose the cloves (no need to peel the outer papery skin).
- Place the bulbs cut-side up in a square piece of foil large enough to completely wrap up the garlic bulb.
- Drizzle each with about ½ tablespoon olive oil, ensuring it seeps into the cloves. Sprinkle with salt and any optional herbs or flakes. Twist and close foil to seal completely.
- Place in a 400 degree preheated oven and bake for 30 minutes, check for doneness, the cloves should feel soft when pressed
- Continue cooking and checking ever 10 minutes until it’s soft. Remove from oven and allow to cool, open foil carefully saving any oils.
- Gently squeeze out each garlic clove and smash with a fork
- Place in a small dish and add the saved oil from the foil packets. Blend well. You could also add just a pinch of salt.
To Store Garlic
- After roasting and making your garlic paste, you can place it in a small leakproof container and cover with additional olive oil. This will store in the fridge for about 2 weeks.
To Roast Garlic in a Clay Garlic Roaster
- Fill a sink or large bowl with water and submerge both the base and lid of the clay roaster for 15–30 minutes. This soaks the porous clay, creating steam during roasting and preventing cracks. Drain and pat dry.
- Slice off the top ¼–½ inch of each garlic bulb to expose the cloves (no need to peel the outer papery skin). Place the bulbs cut-side up in the roaster base. Drizzle each with about ½ tablespoon olive oil, ensuring it seeps into the cloves. Sprinkle with salt and any optional herbs or flakes.
- Fit the lid snugly on the base. For best results, place the roaster on a baking sheet and into a cold oven (do not preheat—this gradual heating protects the clay). Set the oven to 350°F (175°C). Roast for 45–90 minutes, depending on bulb size and desired caramelization
Click HERE to save this Roasted Garlic Paste Recipe to Pinterest

This roasted garlic smeared directly on bread is the absolute best. I was actually just talking about roasted garlic the other day and how long it's been since I made some. It's so simple and a much different taste over raw garlic.
Seriously, I could eat this roasted garlic like candy – it's sooooo good!!